Time35 min prep + 1 hr chilling/freezing + 9 min per batch
Makesabout 50 cookies
CategoryBaking
Tastefully Planned,
Joyfully Cooked.

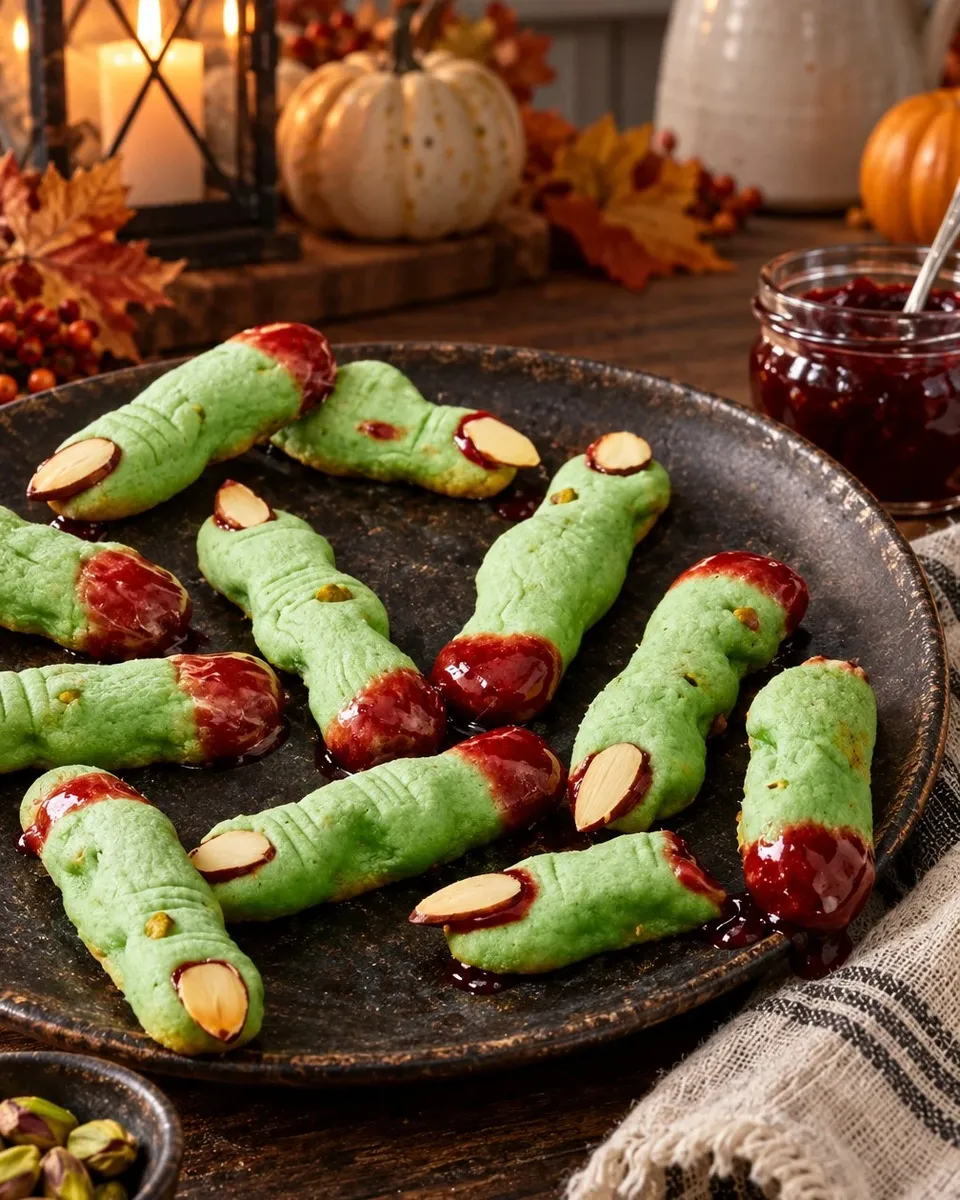
Buttery pistachio cookies shaped into playful green fingers, with sliced-almond nails and a little red jam.

A playful shape with a real cookie underneath
Witch fingers are a decorating project built around a buttery nut cookie, so the flavor deserves as much attention as the shape. Pistachios bring texture and a gentle nuttiness, almond extract adds aroma, and a small amount of red jam gives a bright contrast at the ends. Even a gentle green tint gives the cookies a playful Halloween look on the plate. I would serve a modest tray alongside fresh fruit or a savory snack, giving everyone a little variety at the table. The cookie itself is rich enough that a few carefully shaped pieces feel festive.
Step 1: Start with butter that is soft, not melted
The mixing stage works best when the butter yields easily but still holds its shape. Confectioners’ sugar blends into that butter to make a fine-textured base; a melted, oily mixture will be much harder to shape. Beat until the color lightens, then add the egg and flavorings. Once the flour goes in, use low speed and stop when the dry streaks disappear. Finely chop the pistachios so a large nut piece does not split a thin finger during rolling. If the bowl feels warm after mixing, the planned refrigerator rest will bring the dough back to a more workable texture.
Step 2: Chill and portion the dough
Working with one quarter of the dough at a time keeps the rest firm while you shape the first tray. Roll a small portion gently between your palms and aim slightly thinner than the finished finger you want, because the cookies will spread a little. A consistent tablespoon-size portion helps the batch bake evenly. If a shaped piece sticks to your hands or looks shiny, give it a short chill instead of kneading in extra flour. Extra flour can make the cookies dry and can cover the green color. The refrigerator and freezer are doing useful work here, even though neither step feels like active cooking.
Step 3: Shape the fingers and add the details
Two small pinches are enough to suggest knuckles, and a few shallow knife lines create the folded-skin effect. Deep cuts can weaken the dough and turn into cracks in the oven. Press an almond slice into the nail end firmly enough to leave a seat, but do not push it all the way through. A few pistachio pieces can become little bumps without needing a separate decorating ingredient. The fingers do not have to match exactly; a slightly irregular shape suits the theme. Keep them similar in thickness, however, so the thin ones do not overbake while a thicker center remains soft. A light touch also keeps the almond nail from cutting through the dough before baking.
Step 4: Freeze the shaped tray before the oven
The freezer rest firms the butter after your hands have warmed the dough. That helps the nails and knuckle shapes remain visible when the heat first reaches the cookies. Arrange them with enough room for a little spreading, then place the tray on a level freezer shelf. If space is limited, freeze one lined tray while shaping the next on another cool surface. Do not place raw dough onto a hot tray left from an earlier batch; the bases begin melting before they reach the oven. Let the tray cool or use a second one so each batch starts under similar conditions.
Step 5: Judge the bake by dry tops and firm edges
Green dough makes a pale golden color harder to read. Look instead for edges that have set and tops that no longer look wet, starting with the shortest bake time. The cookie should still be delicate when it first comes out; it firms as it cools. Leaving it in until it feels hard can dry the center and toast the almond nail too far. Rotate a tray if your oven has a hot back corner, but avoid opening the door repeatedly. Let the cookies rest on the baking sheet for a little while, then slide a spatula under the full length of each finger to support it during transfer.
Step 6: Add the jam after baking
The red jam is added after baking so it stays vivid and creates a small glossy edge around the almond. Use only a tiny dab under the nail; too much can run across the cookie and make it messy to hold. Cherry, strawberry and raspberry give slightly different sweetness and color, so use a smooth jam already open in the refrigerator. If an almond is firmly attached, do not force it off and break the finger. A little jam applied beside it still creates the intended effect. Let the cookies finish cooling before packing so the decoration has time to settle.
Work in an order that keeps the details neat
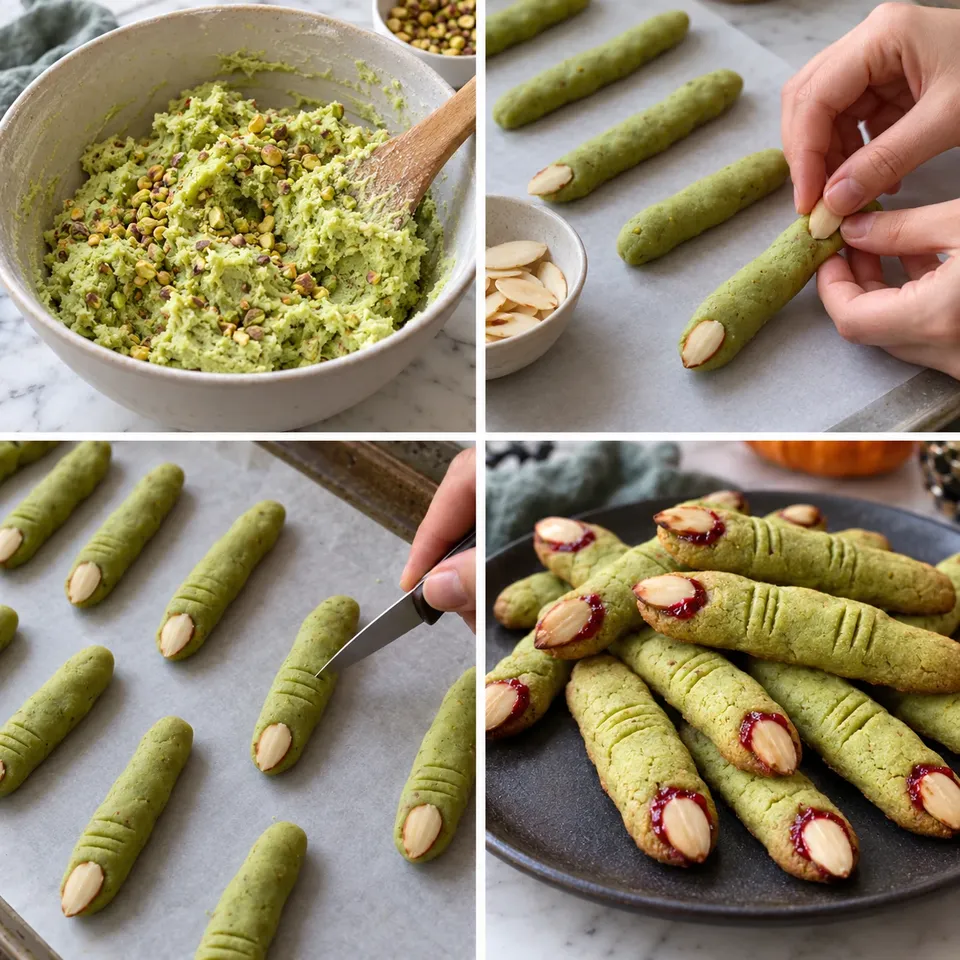
Set out the almonds and finely chopped pistachios before you begin shaping so you are not searching for them with dough-covered hands. Shape a small row, add their nails and score their knuckles, then move on. This lets you repeat a manageable sequence rather than handle fifty soft logs at once. A cool lined tray and a small knife are enough; an elaborate sculpting set is not needed. If the dough warms during decoration, chill the tray before adding more pressure. Details made in very soft dough can flatten as you move the fingers, while a slightly firm surface holds a light scoring line much more clearly.
Separate coloring from the flavor decisions
Green food coloring changes the appearance, not the structure or nut flavor. Start with the listed few drops and mix them evenly into the wet ingredients before the flour goes in. Adding lots of liquid color afterward can create wet streaks and require extra handling. A pale green can look just as readable as a very dark one once the almond nails and jam are in place. Almond extract is much stronger than a typical vanilla addition, so measure rather than pour casually. Keeping those two jobs distinct helps avoid trying to make the cookie more dramatic by adding an ingredient that actually changes its flavor.
When a nail loosens or a finger cracks
A loose almond after cooling is not the end of the cookie; the small dab of jam can hold it in its original indentation. If a finger cracks in the middle, serve it as a broken spooky piece rather than pressing it together while hot and risking more crumbs. Cracks often come from deep scoring, a large nut piece or moving the cookies too early. For the next tray, keep the cuts shallow and support the whole length with a spatula. Save any completely broken pieces for a small dessert bowl or tasting plate. They still have the same pistachio flavor even if they no longer suit a neat gift box.
Pair the jam with the nutty dough
Cherry, raspberry and strawberry jam all work as the red accent, but they bring different levels of tartness. Choose a smooth spoonful without very large fruit pieces so it can sit under a thin almond slice. A little tartness balances the buttery cookie, while a thick pile of jam makes it sticky rather than more flavorful. If the jam is very stiff, stir a small portion in a bowl until spreadable instead of heating the entire jar. Use a clean spoon each time and keep crumbs out of the jar. This small finishing detail is a good place to use what is already open, while following that jar’s storage directions.
Share clearly and keep the batch practical
These cookies contain wheat, egg, dairy, pistachios and almonds, so identify the nuts clearly when sharing them. The shape can hide what is inside, especially when the dough is colored. Store cooled cookies in a shallow covered container and separate layers with parchment; follow the jam label for storage after opening, using refrigeration when required. For a more flexible plan, freeze the plain baked fingers and add jam after thawing. The dough may also be made up to two days ahead. Keeping the decorating step small makes it easier to bake only what is needed without leaving a large finished batch to lose its texture.
Shape the dough slightly slimmer than the finished finger you want. Cold dough and the freezer rest help keep the knuckle details from spreading away.
Joy.Buttery pistachio cookies shaped into playful green fingers, with sliced-almond nails and a little red jam.
Tap each ingredient as it goes into your basket or bowl.
Follow the steps in order to make this recipe.
Beat confectioners’ sugar and softened butter until pale, about 2 minutes. Beat in the egg, then almond extract, vanilla and green coloring.
Whisk flour and salt separately, then mix into the butter base on low just until combined. Fold in chopped pistachios. Cover and chill at least 30 minutes, or up to 2 days.
Line baking sheets with parchment. Work with one quarter of the dough at a time, keeping the rest cold. Roll tablespoon-size portions into fingers about 3 inches long and slightly thinner than a little finger. Press an almond slice onto one end. Pinch two knuckles, score fine lines with a knife and add a few pistachio pieces if desired.
Freeze shaped cookies 30 minutes. Heat the oven to 375°F. Bake in batches for 7–9 minutes, turning trays as needed, until the edges are firm and tops look dry. Cool slightly before decorating.
Lift each almond gently, add a tiny dab of jam and replace the almond. Add a little jam to the opposite end if desired. Cool completely before serving.
Buttery pistachio cookies shaped into playful green fingers, with sliced-almond nails and a little red jam.
Joy’s kitchen note · Shape the dough slightly slimmer than the finished finger you want. Cold dough and the freezer rest help keep the knuckle details from spreading away.