Time30 min active + at least 1 hr filling freezing + 45 min dough chilling + 14 min baking
Makes12–14 cookies
CategoryBaking
Tastefully Planned,
Joyfully Cooked.

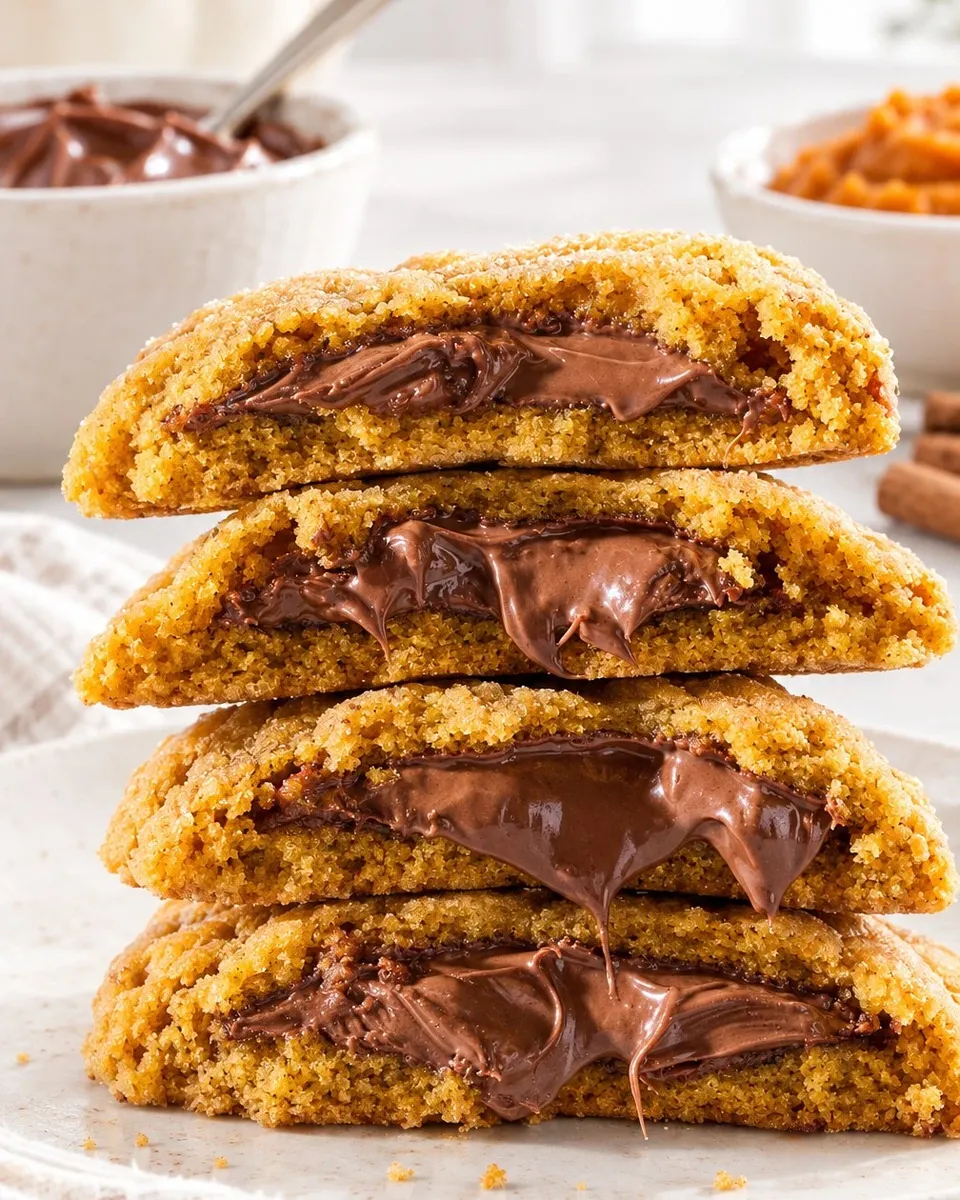
Soft cinnamon-pumpkin cookies wrapped around a chocolate-hazelnut center, with a light sugar coating.

A filled cookie needs a little advance work
Begin with the chocolate-hazelnut filling so it has time to freeze while you make the pumpkin dough. Portion it onto a lined tray and give it time to become firm. The cookie dough has its own short freezer rest after mixing, and those two waiting periods can overlap partly. Having both the filling and dough properly chilled keeps shaping manageable and helps you seal each center neatly. A defined batch of twelve to fourteen large cookies also makes it easier to decide how many are needed before opening more ingredients.
Plain pumpkin, measured twice
Pumpkin puree brings moisture as well as flavor. In this dough, some of that water is blotted away so the cookies remain tender without turning into little cakes. Begin with the listed half-cup, spread it on a plate and press with paper towels until the amount is reduced to about one-third cup. Re-measuring matters more than counting a fixed number of towels, since pumpkin brands differ. Use plain puree rather than sweetened pie filling. The concentrated pumpkin still contributes its character, while the dough has a better chance of staying strong enough to hold the filling.
Step 1: Make small frozen centers
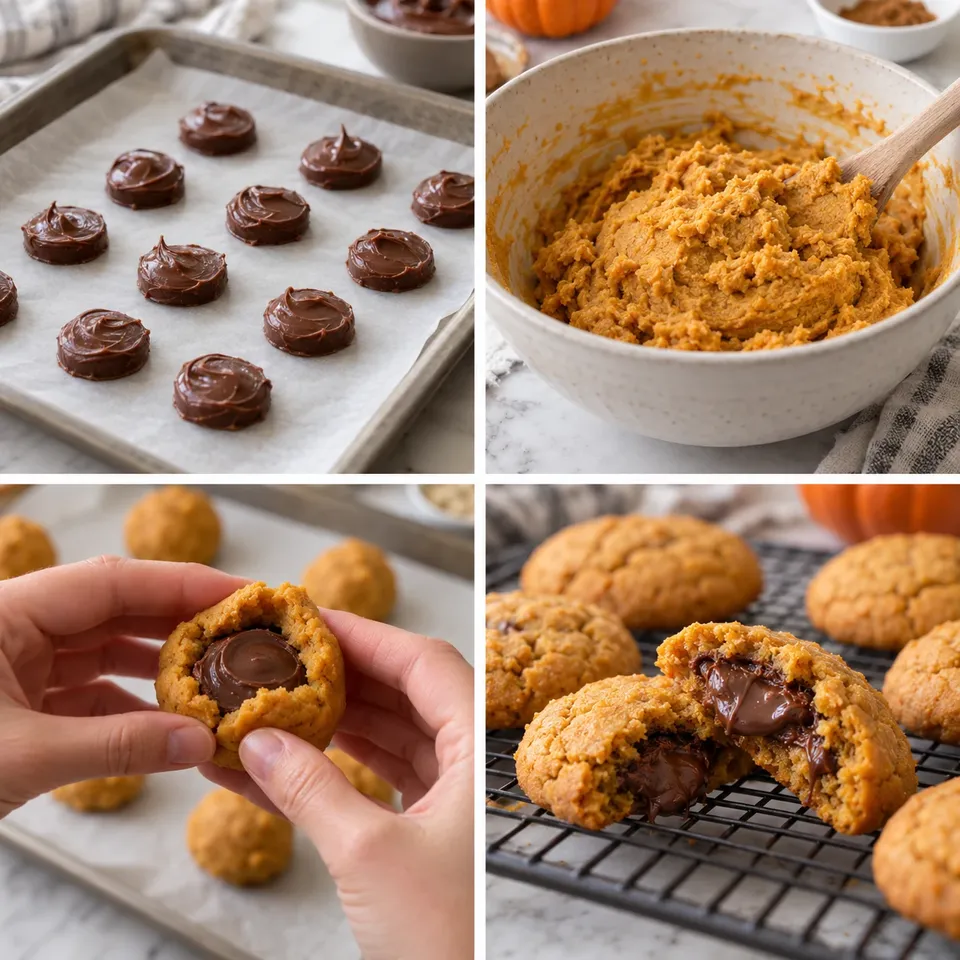
Use a tablespoon measure to portion the chocolate-hazelnut spread as evenly as practical. Flattening each scoop slightly makes it easier to cover with two small dough rounds later. The portions need to be firm enough to lift cleanly from the parchment; a sticky, bending center will smear over the seam as you work. Keep most of the tray in the freezer and remove only a few portions at a time if the room is warm. A large frozen center may seem generous, but it leaves less dough around the edges and increases the chance that filling will leak onto the baking sheet.
Step 2: Cream the base, then stop at the flour
The softened butter, brown sugar and a quarter-cup of granulated sugar are beaten until creamy before the yolk and pumpkin enter. Scrape the bowl so the dense pumpkin is distributed rather than sitting in a streak beneath the butter. Add the leaveners evenly and fold the flour only until the dry patches disappear. The remaining granulated sugar is for the outside, not an extra addition to the dough. Keep that bowl separate from the start. The yolk enriches the dough without adding the extra liquid of a whole egg, so do not casually substitute an entire egg and expect the same texture.
Step 3: Chill and wrap the filled dough
The freezer rest makes the dough easier to flatten around the filling without sticking heavily to your hands. It should be firm and workable, not so frozen that it fractures when pressed. If it is too soft, pause and chill rather than burying the outside in extra flour. Divide each cookie’s dough between a bottom round and a top round, with enough overlap to seal around the center. Pinch the seam before rolling into a ball; rolling alone can hide a weak opening without actually closing it. A complete seal is more important than making a perfectly round ball.
Step 4: Coat with sugar and space the cookies
Roll the sealed balls lightly in the remaining sugar, then give them room on the lined trays. These are filled cookies with a substantial amount of dough, so crowding can leave their edges touching before the centers are ready. Rotate the trays as directed if baking both at once, and watch the set edges rather than waiting for the entire cookie to feel firm. Pumpkin cookies remain soft in the center when hot. Poking them repeatedly can break the shell around the filling. Let the oven do the setting, then allow the tray rest to strengthen the structure before moving them.
Step 5: Bake until the cookies are set
The finished cookie should look puffed with set edges and no visibly wet dough on the exterior. A soft center is expected because the filling is designed to stay creamy, but it should be surrounded by baked cookie. The filling becomes much hotter than the outside suggests, so do not bite a cookie straight from the oven to check it. Let it cool enough for the center to become safely manageable. A little spreading is normal, while a large puddle of escaped chocolate usually points to a weak seam, overly warm filling or too little dough around the center.
Plan portions and save the remaining pumpkin
These are rich cookies, and one can be a generous dessert portion without adding a large scoop of ice cream or more sugar on top. The recipe uses less than a full can of pumpkin, so measure and label the remainder for another recipe or freeze it in a practical amount. Wrap spare filling portions and return them to the freezer promptly, where they can stay firm until you have a plan for them. Cool the baked cookies fully before storing in a covered container so trapped steam does not make them sticky. If freezing baked portions, separate them so only the number needed has to be thawed.
Portion the dough before the filling warms
A small scoop or tablespoon helps divide the dough into consistent top and bottom pieces. Set up several bottom rounds before bringing out a few frozen centers, then seal those cookies and return to the remaining dough. This rhythm keeps the filling from sitting at room temperature while every portion is weighed and flattened. If the kitchen is warm, chill the shaped cookies briefly before baking rather than allowing the whole tray to soften as the oven heats. Consistent portions also make the stated yield more useful: very large first cookies can leave too little dough to cover the last filling coins.
Keep the center away from the outside
A smear of chocolate-hazelnut spread on the dough’s outer seam interferes with sealing. If a frozen coin softens and leaves a streak, clean or cover that spot with a small piece of dough before rolling. Do not try to tuck exposed spread under the cookie and hope the baking sheet will hold it in place. The filling needs a continuous dough shell, especially around the underside where it rests against the hot tray. Handle each portion with lightly cooled clean hands if necessary, and keep the filling tray frozen between rounds. The clean seam is a structural step, not only a cosmetic detail.
Cinnamon supports pumpkin rather than hiding it
The recipe uses a restrained amount of cinnamon and vanilla around the chocolate-hazelnut center. Pumpkin gives color, moisture and a mild earthy sweetness, while the filling is the richest flavor. Adding a large amount of pumpkin spice can make it harder to taste that balance and does not solve a dough that is too wet. Focus first on blotting the puree and measuring the flour accurately. If you decide to vary the spice in a later batch, change a small amount at a time and keep a note of it. A clear baseline makes it easier to understand which change improved the cookie for your own taste.
Share a filled cookie thoughtfully
A warm center is part of the attraction, but it should be cooled enough to eat safely, especially when serving children. Break or cut a cooled cookie if you want to show the filling rather than encouraging a bite straight from the oven. Chocolate-hazelnut spread commonly contains nuts and milk, and the dough contains egg and wheat, so keep the ingredient information available for anyone who needs it. A generic description does not remove those allergens. These are substantial sweet cookies; a smaller dessert plate and a drink can be enough. Extra toppings are optional and should not distract from the soft pumpkin shell and creamy center. A clean napkin and a cooled center make the cookie much easier to enjoy.
Keep the filling portions frozen until the moment they are enclosed. Blotting the pumpkin and sealing the dough edges are both important for holding the soft center inside.
Joy.Soft cinnamon-pumpkin cookies wrapped around a chocolate-hazelnut center, with a light sugar coating.
Tap each ingredient as it goes into your basket or bowl.
Follow the steps in order to make this recipe.
Place 14 tablespoon-sized portions of chocolate-hazelnut spread on a parchment-lined tray and freeze at least 1 hour, until firm enough to handle.
Spread 1/2 cup pumpkin puree on a plate and blot repeatedly with paper towels to remove excess moisture. Re-measure: about 1/3 cup should remain.
Beat the softened butter, brown sugar, salt and 1/4 cup granulated sugar until creamy. Mix in yolk, vanilla, cinnamon and the blotted pumpkin. Mix in baking powder and baking soda, then fold in flour just until no dry streaks remain. Cover and freeze about 45 minutes, until firm.
Heat the oven to 350°F and line two baking sheets. Place the remaining 1/2 cup sugar in a bowl. Flatten 1 tablespoon dough, add one frozen filling portion, cover with another flattened tablespoon of dough, and pinch the seam closed. Roll into a ball and coat with sugar. Keep unused filling frozen while working.
Arrange about 2 inches apart. Bake about 14 minutes, rotating sheets halfway through, until puffed and the edges are set. Let rest briefly on the sheets, then transfer to a rack to cool. The centers are very hot immediately after baking.
Soft cinnamon-pumpkin cookies wrapped around a chocolate-hazelnut center, with a light sugar coating.
Joy’s kitchen note · Keep the filling portions frozen until the moment they are enclosed. Blotting the pumpkin and sealing the dough edges are both important for holding the soft center inside.