Time30 min prep + 67–79 min baking + 30 min crust chilling + 15 min cooling (add 2 hr if making dough from scratch)
Makes8 servings
CategoryBreakfast
Tastefully Planned,
Joyfully Cooked.

Bake a cheese quiche with milk, cream and your choice of cooked add-ins. Includes crust chilling, blind baking and tips for a balanced filling.

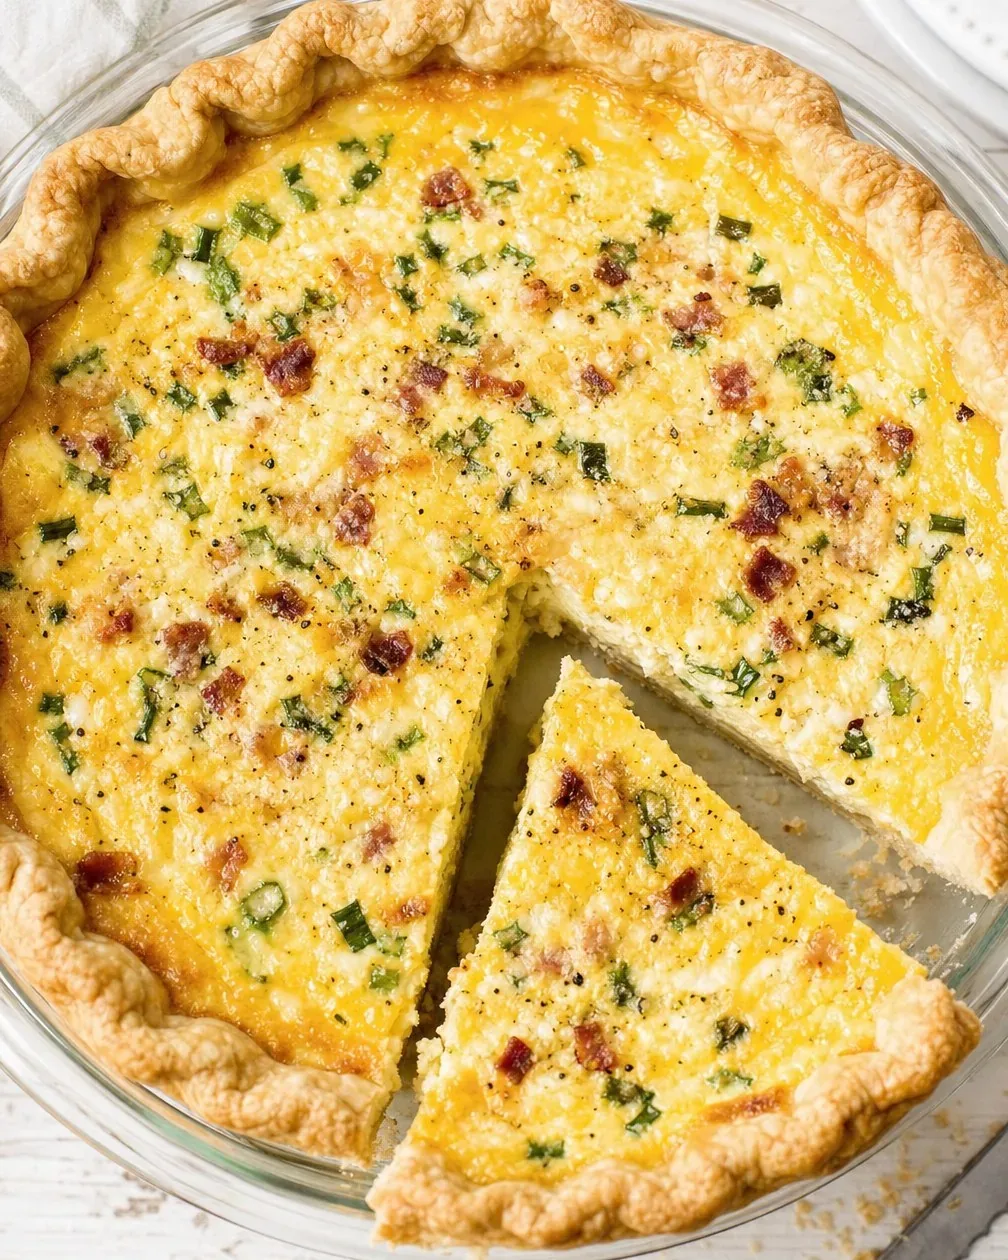
A quiche that leaves room for the custard
A good quiche gives the eggs as much attention as the filling. Cheese and vegetables are lovely, but the custard needs room to surround them, settle between them, and make a slice that holds together. I like a slice with enough room for each forkful to bring together tender egg, a distinct piece of filling and a little pastry. That balance starts before anything goes into the oven.
This recipe is generous without asking for a long shopping list. One crust, four eggs, milk, cream, and a cup of cheese form the foundation. The add-ins are a place to use a sensible amount of something already in the refrigerator. Up to two cups is a limit, not a goal you have to reach. A smaller amount of well-prepared filling can make a much nicer quiche than a crowded shell.
Choose a cheese with a clear purpose
Cheddar brings a familiar sharpness; Gruyere gives a nutty direction; feta and goat cheese leave little tangy pockets. The recipe allows any of these, so choose around the add-ins and what else you plan to cook. A block of cheddar that can also go into sandwiches may be a more useful purchase than several specialty cheeses bought for one pie. Shred or crumble the cheese so it distributes easily.
Keep the cup loosely filled. Packing extra cheese into the measure changes how much room remains for the custard and increases the saltiness, particularly with feta. The eggs, whole milk, and heavy cream provide the structure and richness; the cheese doesn't need to do all the work. I prefer one cheese with a recognizable flavor to a mixture assembled simply because several packages are open.
Step 1: Cook moisture out of the filling
Think about the water in the add-ins before considering a combination. Cooked mushrooms can carry a surprising amount of liquid, and spinach needs thorough squeezing after cooking or thawing. Leaving that water behind in the pan or strainer is more useful than trying to bake it out after the custard is already in the crust. Cut the ingredients into pieces small enough to fit comfortably on a fork.
Any meat used here should already be cooked, and hot additions should cool before they meet the eggs. A little cooked ham with a mild vegetable, or mushrooms with a stronger cheese, can give the filling direction without filling every available space. These are optional choices, not additions you need to buy. Keep the total within the stated allowance, and avoid pouring leftover cooking liquid into the bowl along with the food.
Step 2: Prepare and chill the pastry
The brief mixing stage can make quiche sound like a last-minute meal, but the crust sets the schedule. Homemade dough needs its refrigerator time before rolling, and the fitted shell needs another chill. Making the dough the night before is useful because it moves that wait out of the lunch or dinner window. Check the method's advance options rather than expecting warm, newly mixed dough to behave like a rested disk.
The recipe uses one crust in a nine-inch pie dish. If your dough recipe makes two disks, the second belongs to another baking project. Roll the chilled disk evenly, turning it as you work so it doesn't stick underneath. A little flour on the work surface is helpful; a heavy coating can make the pastry harder to handle and leave dry patches that never become part of a tender crust.
Step 3: Fit gently, then let the cold help
Lower the pastry into the dish and guide it into the corners without pulling it tight. Stretched dough tries to pull back as it bakes, leaving a shorter rim just when you need it to contain the custard. Fold the overhang back to build the edge, then crimp in whatever simple pattern feels comfortable. Even thickness and a secure rim matter more than decorative precision.
Give the fitted crust the full chill in the method. This is a useful pause for finishing the vegetables, shredding cheese, or clearing a spot for the hot pie dish. If you're preparing the shell farther ahead, cover it as directed so the exposed surface doesn't dry out. The refrigerator is part of the preparation here; skipping it doesn't truly save time if the pastry becomes difficult to manage in the oven.
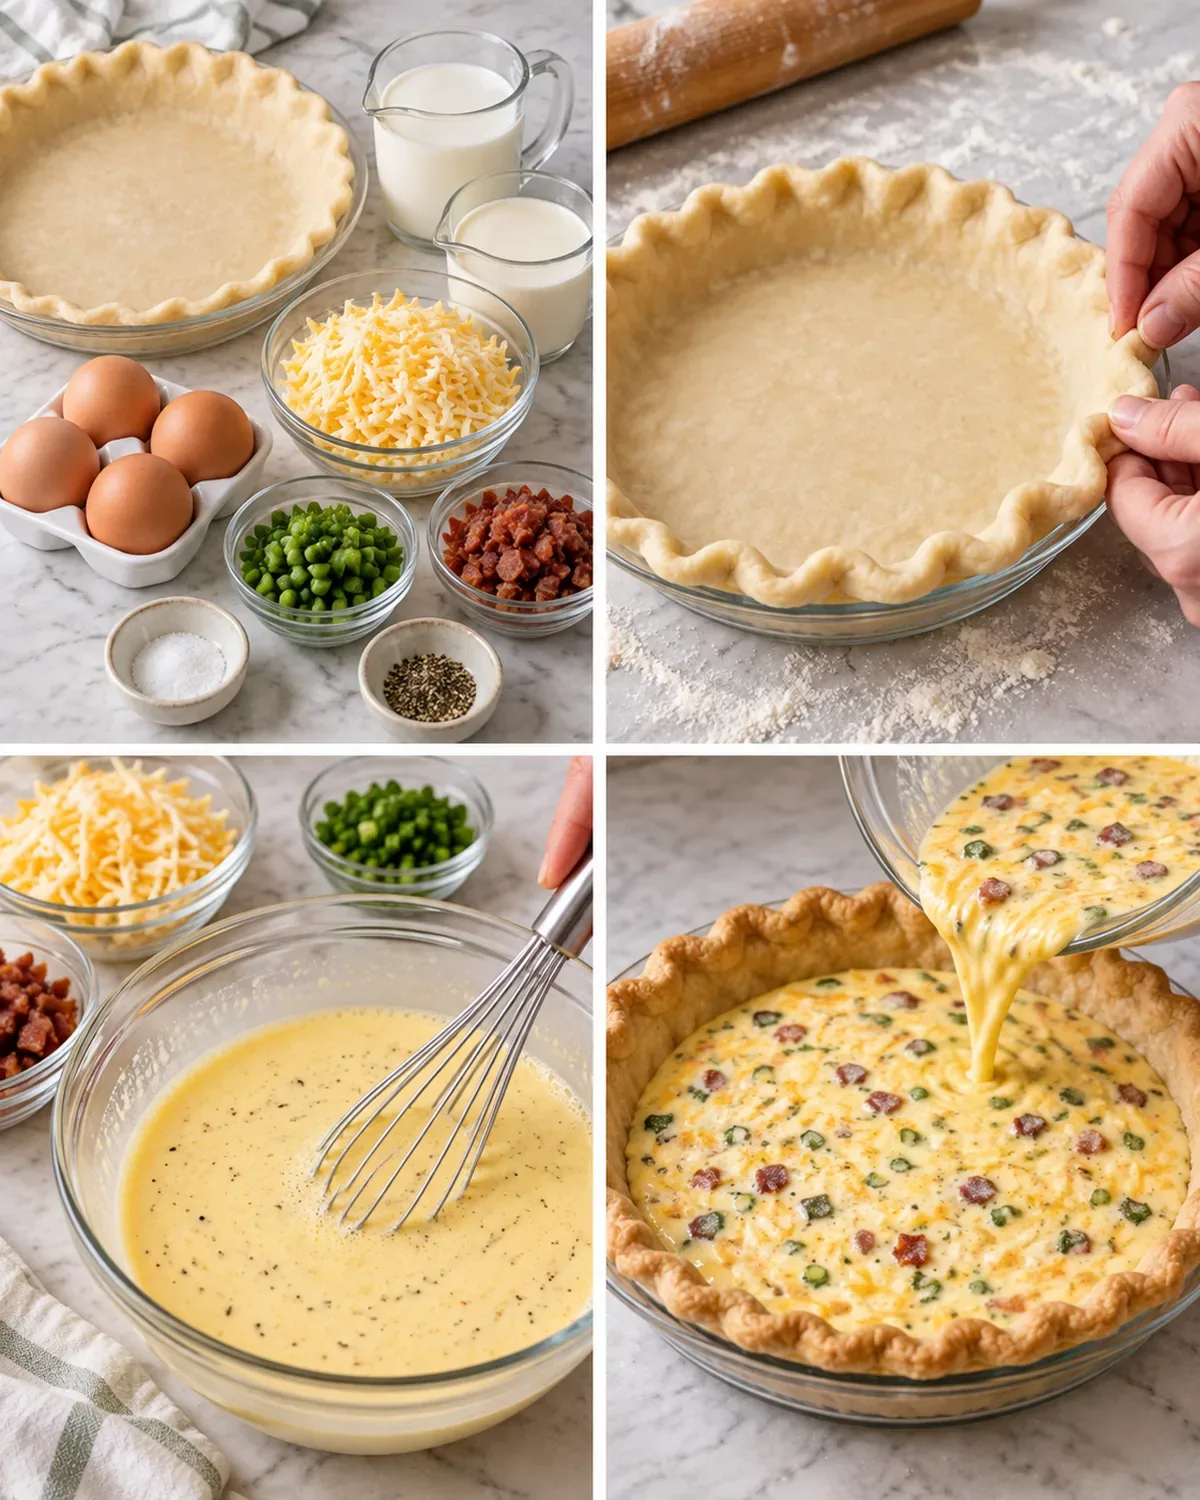
Why the empty crust gets a head start
Blind baking gives the base time to begin cooking before a wet custard covers it. Line the cold shell and spread the weights across the base rather than leaving a small heap in the middle. Support near the edges helps the sides keep their shape. Lift the parchment carefully when the first stage is done; it will be holding hot weights, so have a heatproof place ready for it.
The uncovered second stage lets the base begin coloring. Look at the bottom as well as the rim: a pale, damp-looking center needs that head start even if the crimped edge seems ahead of it. Once the shell is ready, lower the oven temperature for the filled quiche. The pastry and the custard benefit from different baking conditions, which is why the change in temperature belongs in the plan.
Step 4: Mix for an even filling
Whisk the eggs with the milk, cream, salt, and pepper until evenly blended, following the short mixing time in the recipe. The goal is a uniform custard, without streaks of egg white that bake differently from the rest. This isn't a mixture to whip indefinitely for height. Stir in the cheese and prepared add-ins afterward so their texture stays distinct.
Set the pie dish somewhere steady before pouring. If your dish is shallow, don't force in more than it can comfortably hold, even when a little mixture remains in the bowl. Filling right to a fragile edge makes moving it needlessly difficult. A baking sheet can give you a stable carrying surface. Spread any clustered ingredients gently so one slice doesn't receive all the vegetables while another gets mostly custard.
Step 5: Bake and check the center
As the quiche approaches the end of its baking window, focus on the center. The outside should look set while the middle has a small, gentle movement rather than a wave of liquid. The aim is a tender custard, so continuing until every bit is rigid can work against the texture. The stated time is a checking window, and the appearance of the filling helps you decide where within it your quiche belongs.
Pastry sometimes colors faster than the custard settles. A crust shield gives the exposed rim some protection without covering the whole pie. Keep an eye on the same sections of crust that were already dark after blind baking. Once the quiche leaves the oven, its fifteen-minute rest is still part of making a clean slice; cutting immediately asks a very hot filling to support itself too soon.
Plan a meal around a slice
Eight servings make this useful for a meal with a few portions left to plan around. I like something crisp and fresh beside rich egg and cheese: a salad or a simple vegetable is enough. Keep the optional toppings simple and use what already fits your meal. Herbs from the filling or another planned meal make an easy finish, and you can add a spoonful of sauce if you enjoy it.
Think about the plate before deciding how many additions belong inside the quiche. If the side dish already uses the vegetables you want to serve, the filling can stay simpler. That is a practical way to use produce with purpose and keep flavors clear. A quiche with one thoughtful pairing can feel more complete than a crowded version surrounded by several unfinished side dishes.
Keep the next slice in good shape
Cover and refrigerate leftovers within the recipe's four-day limit. Store slices in a way that protects the pastry edge from being crushed by other food. If you're planning packed portions, keep a salad or juicy tomato topping separate so the crust isn't sitting against moisture before lunch. The quiche can be served cooled as the method allows, which makes it flexible for a meal that doesn't need to begin straight from the oven.
For a warm portion, gentle reheating is kinder to the custard than prolonged high heat. Warm only what you intend to serve and check the center, not just the hot pastry edge. Labeling the container with the day it was made keeps the remaining portions visible in the meal plan. The useful economy of quiche comes from actually enjoying those later slices, with the same attention given to the first one.
I start with the filling's moisture, not the number of add-ins. Squeezed spinach and cooked, well-drained mushrooms give the custard a better chance to set. Keep the cheese loosely measured, leave room in the crust, and rest the quiche before slicing. A crisp salad alongside is plenty to make it lunch.
Joy.Bake a cheese quiche with milk, cream and your choice of cooked add-ins. Includes crust chilling, blind baking and tips for a balanced filling.
Tap each ingredient as it goes into your basket or bowl.
Follow the steps in order to make this recipe.
Have the pie dough ready before starting the filling. Homemade dough needs at least 2 hours in the refrigerator before rolling, so making it the night before keeps the next day's work simpler.
Roll one chilled dough disk on a floured surface into a 12-inch circle, turning it regularly to keep it even. Fit it into a 9-inch pie dish without stretching. Fold the overhang back onto itself to build a rim, then crimp with your fingers or a fork. Refrigerate at least 30 minutes, or up to 5 days; cover if chilling longer than 30 minutes. Save a second dough disk for another recipe.
While the fitted crust chills, heat the oven to 375°F (190°C).
Line the cold crust with parchment and distribute pie weights or dried beans across the base. Bake 15–16 minutes, until the rim starts coloring. Carefully lift out the parchment and weights, prick the base with a fork, and bake another 7–8 minutes until it begins to color. Set aside. It may be filled while warm, or cooled, covered and refrigerated up to 3 days ahead.
Turn the oven down to 350°F (177°C) before baking the filled quiche.
Beat the eggs, whole milk, cream, salt and pepper with a mixer whisk on high for about 1 minute, until evenly blended. Stir in the cheese and chosen add-ins, then pour the filling into the partially baked crust.
Bake 45–55 minutes, checking for a center that is nearly set. Protect a darkening rim with a crust shield and avoid baking the custard until hard. Rest 15 minutes before slicing; add optional toppings at serving time. The quiche can also be cooled before serving.
Cover leftovers and refrigerate for up to 4 days.
Bake a cheese quiche with milk, cream and your choice of cooked add-ins. Includes crust chilling, blind baking and tips for a balanced filling.
Joy’s kitchen note · I start with the filling's moisture, not the number of add-ins. Squeezed spinach and cooked, well-drained mushrooms give the custard a better chance to set. Keep the cheese loosely measured, leave room in the crust, and rest the quiche before slicing. A crisp salad alongside is plenty to make it lunch.