Time15 min prep + 12–13 min baking
Makes4 cakes
CategoryDessert
Tastefully Planned,
Joyfully Cooked.

Bake dark chocolate lava cakes with peanut butter centers. Prepare the ramekins and watch for set edges with a soft middle before serving.

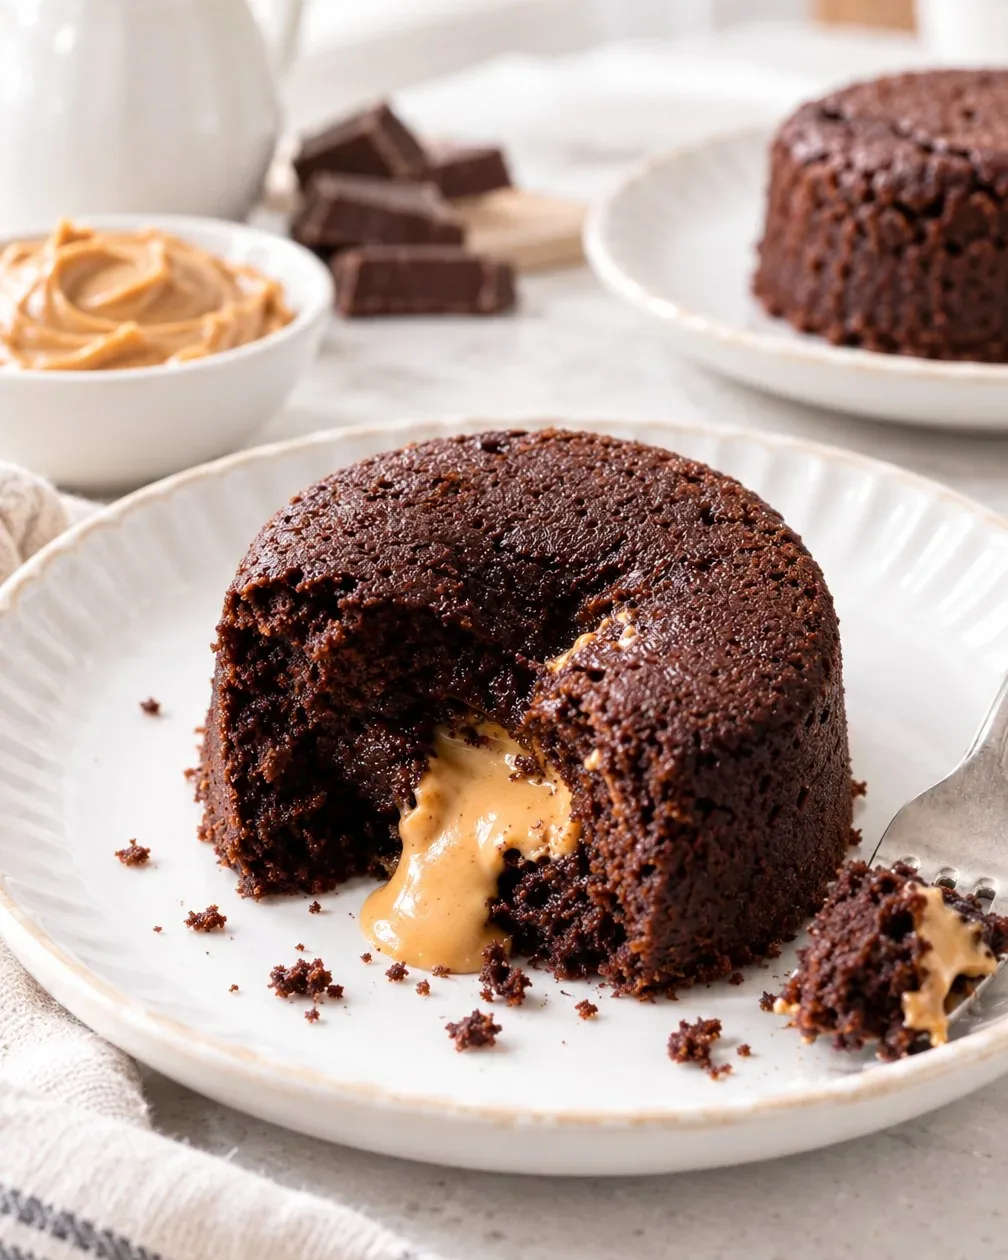
Small cakes with a warm center
A lava cake is a dessert with a short path from oven to plate. The outside needs enough structure to hold its shape, while the center stays soft enough to open under a spoon. Peanut butter gives that middle another flavor and a thicker, creamy pocket. I like the straightforward pairing of chocolate and peanut butter here; it doesn't need several sauces to make the warm cake feel complete.
The recipe makes four individual cakes, which keeps portion planning simple. The active work is brief, but arranging the serving plates and clearing a landing place before you mix are worthwhile. Once the ramekins leave the oven, there isn't a long cooling period in which to find a missing oven mitt or decide which plates to use. A little preparation makes the final minute much calmer.
Buy chocolate for melting, not just sweetness
The larger portion of semi-sweet chocolate forms the body of the batter, with the additional small amount of seventy-percent chocolate deepening the flavor. Keep both amounts in mind when weighing. Add the extra dark chocolate alongside the full semi-sweet quantity to give this version its intended depth. Chop all the chocolate into small, manageable pieces so it melts evenly with the butter.
Choose chocolate you enjoy eating, and consider how the rest of the package will be used before buying several varieties. A small remainder can belong in another planned dessert without becoming an excuse to add more chocolate to these cakes. This batter has relatively little flour, so the chocolate and butter do much of the work. Changing their quantities casually changes more than the strength of the chocolate flavor.
Understand the eggs, sugar, and flour
Whole eggs and additional yolks help create the rich texture and give the outside its structure as it bakes. Keep the separation tidy so shell fragments don't reach the batter. The flour is a modest measure, and spooning and leveling it matters: a densely scooped quarter cup can introduce more flour than intended. Confectioners' sugar mixes readily into this thick batter and belongs with the dry ingredients before combining.
The salt is small but useful against the sweet chocolate and peanut butter. Measure it rather than adding an unconsidered handful because the cakes look rich. Save the unused egg whites for another suitable dish if that fits your meal plan, keeping them covered and refrigerated until needed. I prefer making that decision before separating the eggs, so the extra whites have a purpose instead of becoming an unidentified container.
Step 1: Set up the ramekins before the batter
Use four six-ounce ramekins as directed. Their size helps establish how deeply the batter sits and how quickly the edges bake. A different vessel can change the timing substantially, so don't assume a large baking dish or a muffin pan gives the same result. Put the ramekins on a tray that you can lift steadily; the tray also keeps them together when you move them in and out of the oven.
Coat the interior thoroughly and dust with cocoa, paying attention to the lower corners and the point where the wall meets the base. A missed patch can hold the cake in place when the rest is ready to release. Tap out loose excess rather than leaving a thick pile in the bottom. The preparation is modest, but it gives the warm cake a better chance to emerge with its sides intact.
Step 2: Melt gently and use the pauses
Short microwave bursts let you control the chocolate and butter as they become smooth. Stir after every burst even if the mixture doesn't look fully melted; movement brings the warmer areas together with the cooler pieces. Continue only as needed. Long, unattended heating can make chocolate difficult to work with and can leave the bowl much hotter than the mixture needs to be.
Set the smooth mixture aside while you prepare the eggs and dry ingredients. That pause also lets the immediate heat ease before the eggs are added. Keep utensils dry when working with the chocolate, and use a spatula to scrape the bowl so a heavy streak of chocolate doesn't stay behind. The goal is an evenly combined batter, without treating the melting stage as a race that needs maximum microwave power and no stirring.
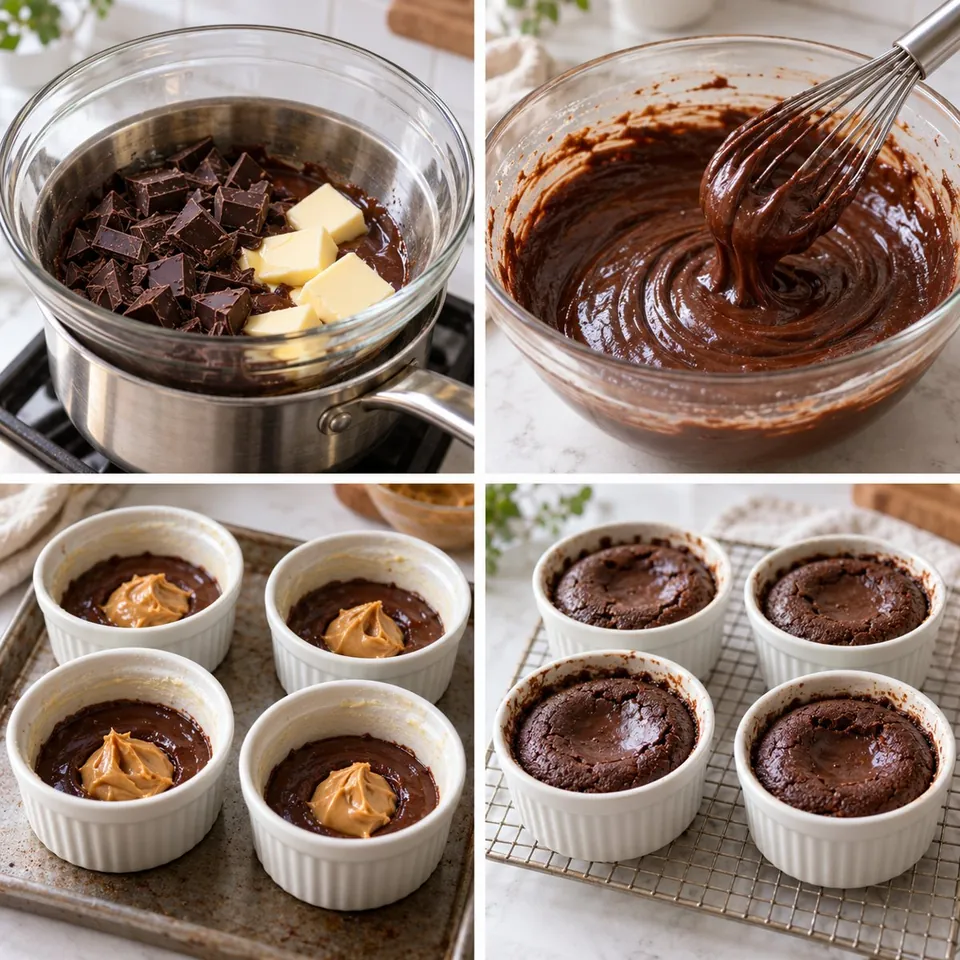
Step 3: Bring the batter together without overworking
Whisk the eggs and yolks separately so they are blended before they reach the thick chocolate. Combine the dry ingredients in their own small bowl as the method describes, then stir both mixtures into the melted chocolate with a spatula. It can look dense; that alone doesn't mean it needs additional milk or another unlisted liquid. Scrape around the bottom and sides where dry flour can hide.
A brief whisk can break up a stubborn lump, but the batter doesn't need prolonged beating. Stop when it is uniform rather than trying to make it airy like a layer cake. Divide it among the prepared ramekins with attention to even amounts. If one vessel receives considerably more, it will have a different center at the same baking time, making the final check harder than it needs to be.
Step 4: Add the peanut butter centers
Creamy peanut butter is the listed filling because it makes a distinct smooth pocket. Stir it in its own container first if needed so you're measuring an even consistency rather than taking only a firm or oily part. Place the measured amount in each cake and press it slightly below the batter. It doesn't need to vanish completely, and it doesn't need to be stirred through the chocolate.
Keep each peanut-butter center to the recipe’s portion so enough cake batter surrounds it. I like to save the remaining peanut butter in the jar for ordinary meals, keeping these small cakes in balance. This is a small cake whose proportions matter more than elaborate decoration.
Step 5: Bake until the edges are set
Begin checking at the time in the method, looking for firm edges and a top that is still a little soft. The ramekin material and the added dark chocolate can affect where the cakes fall within the timing. An entirely liquid-looking surface needs more attention, while a completely firm top may signal a more thoroughly baked center. The clock tells you when to look; the cake tells you what is happening.
There is no reason to open the oven repeatedly from the moment the tray goes in. Let the initial bake do its work, then check with purpose. Remember that this recipe is designed around a soft center, so its doneness cues differ from a cake tested until a toothpick comes out dry. If a firmer chocolate cake is your preference, understand that the flowing effect will be reduced rather than expecting both textures at once.
Step 6: Unmold with a clear place to work
Give the cakes the short rest in the method, keeping the serving plates close. Ramekins retain heat, so use oven mitts for both the turn and any adjustment afterward. Set a plate over the top, hold the pair securely, and turn carefully. Give the cake a moment to release rather than shaking it violently while hot. Keep hands clear of the hot ceramic even if the outside of the cake looks ready to touch.
Serve promptly once the cakes are on their plates. A scoop of ice cream is an optional temperature contrast, and a little drizzle can be enough if you choose one. The peanut butter is already inside, so additional peanut butter or chocolate syrup should suit your preference rather than become compulsory. Four cakes with a simple finish keep the meal's last step focused on the warm dessert itself.
Plan around serving, then protect leftovers
These cakes are at their best when the baking and serving windows meet. If you prepare batter ahead and refrigerate it, account for its colder starting point and check the set edges rather than copying the timing blindly. Keep the prepared ramekins covered in the refrigerator, and avoid leaving raw batter out while the rest of dinner runs long. Setting up early helps; waiting for a convenient moment to bake helps more.
If a baked cake remains, cover and refrigerate it rather than treating the soft center as shelf-stable. Reheating changes the texture, so expect a firmer center instead of promising the same flow as a freshly unmolded cake. Warm only the portion you intend to serve, using gentle heat and watching closely. That makes a remaining dessert useful without asking it to repeat a delicate oven-to-plate moment it has already passed.
There's plenty of practical cooking in my day, but I still like leaving room for a little chocolate. Have the ramekins and plates ready before mixing so the last few minutes feel calm. If refrigerating the prepared batter, allow for a different baking time and check the set edges carefully. These cakes are loveliest served warm, with their soft centers still inside.
Joy.Bake dark chocolate lava cakes with peanut butter centers. Prepare the ramekins and watch for set edges with a soft middle before serving.
Tap each ingredient as it goes into your basket or bowl.
Follow the steps in order to make this recipe.
Grease four 6-ounce ramekins with nonstick spray, then dust the interiors with cocoa. Coat the corners too so the warm cakes can release.
Heat the oven to 425°F (218°C).
Put butter, the 170g semi-sweet chocolate and the additional 10g 70% dark chocolate in a microwave-safe bowl. Heat in 10-second bursts, stirring each time, until the mixture is smooth. Set aside.
Mix flour, powdered sugar and salt in one small bowl, and whisk eggs and yolks in another. Add both to the melted chocolate and stir gently with a spatula. Use a whisk briefly for any stubborn lumps; the finished batter will be fairly thick.
Divide the batter between the ramekins. Add peanut butter to each and press it slightly below the surface with a spoon; it does not need to disappear completely.
Set the ramekins on a tray and begin checking after 12 minutes. Use the edges and center to decide whether more baking time is needed; the added chocolate and your ramekins may affect the timing. Look for firm edges while the tops remain a little soft. Rest 1 minute. Using oven mitts, place a plate over each ramekin and carefully turn over to release the cake. Serve straight away, with optional ice cream, melted peanut butter or chocolate syrup.
Bake dark chocolate lava cakes with peanut butter centers. Prepare the ramekins and watch for set edges with a soft middle before serving.
Joy’s kitchen note · There's plenty of practical cooking in my day, but I still like leaving room for a little chocolate. Have the ramekins and plates ready before mixing so the last few minutes feel calm. If refrigerating the prepared batter, allow for a different baking time and check the set edges carefully. These cakes are loveliest served warm, with their soft centers still inside.