Time20 min prep and assembly + 40–50 min cooking + 1 hr batter rest + cooling + 2 hr chilling
Makes1 cake, about 10 inches; 8–10 slices
CategoryDessert
Tastefully Planned,
Joyfully Cooked.

Layer thin matcha crepes with lightly sweetened whipped cream, then chill for a neat, tender green-tea cake.

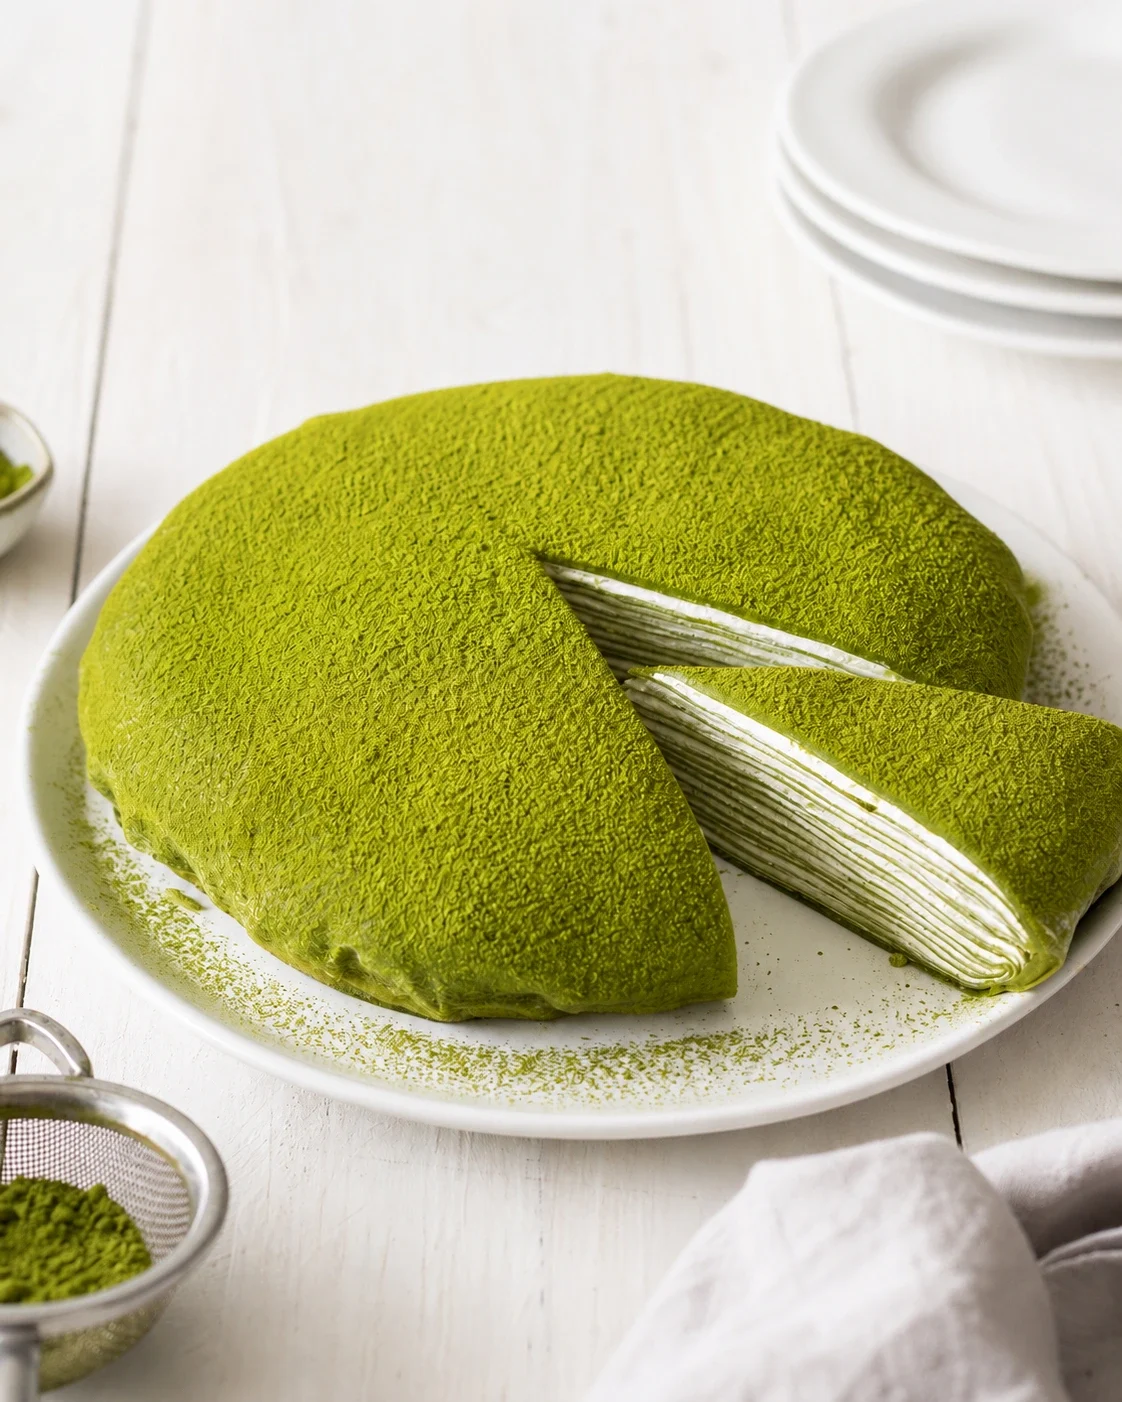
Layers worth making room for
A mille crepe cake looks elaborate because you can see so much of its construction in one slice. Thin green crepes alternate with pale cream, and the top gets a fine dusting of matcha. The cake comes together through a series of steady, manageable tasks. I like approaching it as a sequence of small tasks: smooth batter, patient cooking, complete cooling and careful stacking. None needs to be rushed just because the finished cake looks like a special occasion.
This is a cake to plan around the refrigerator as much as the stove. The batter rests for at least an hour, the crepes cool fully and the assembled cake chills for at least two hours. Those pauses have real jobs. The active preparation and assembly time doesn't describe the whole afternoon. Before mixing anything, make room for both the batter and the shaped cake, and choose a serving platter that can hold the roughly ten-inch finished dessert.
Step 1: Mix the matcha batter gently
Matcha gives the crepes their color and a tea flavor that sits well beside sweet cream. Because the powder can clump, sifting it with the cake flour and baking powder is more than a tidying step. The two additions make the dry ingredients easier to incorporate without vigorous beating. Cake flour is the flour specified here; a casual scoop of a different flour can change how delicate the cooked layers feel.
Warm milk dissolves the sugar, but it should not boil. Adding it gradually to the beaten eggs helps bring the wet mixture together without exposing one small area of egg to too much heat. The melted butter then joins that mixture. I prefer having the sieve and resting container ready before starting, so the batter can move smoothly from bowl to refrigerator. It is a small organizational choice that matters more than buying an extra tool for an already manageable task.
Step 2: Strain and rest the batter
A fine sieve catches stubborn lumps that gentle whisking may leave behind. Pressing the idea of smoothness too far with aggressive mixing isn't helpful; the recipe asks for a gentle whisk just until smooth, followed by straining. The batter should pour evenly enough to swirl into a thin film. A few clumps are easier to handle with the sieve now than to discover later as thick spots in a crepe.
The covered rest in the refrigerator gives the flour time to hydrate and lets the batter settle. Before each crepe, stir the bowl to bring the mixture back to an even consistency. Ingredients can settle between pours, so this small step helps the first and last crepes cook alike. When the layers start looking different despite steady heat, check the batter as well as the pan; the mixture in an unstirred bowl can change as you work through it.
Step 3: Prepare the two crepe pans
This method uses one larger crepe from a twelve-inch pan and the remaining layers from a ten-inch pan. The larger crepe eventually becomes the smooth outer top after the cake is shaped and inverted. Its extra border has a purpose, so don't trim it away as an untidy edge. The smaller crepes define the cake's layered center, while that first larger one helps the finished form look rounded.
A nonstick surface and a very light film of neutral oil help a thin crepe release. Wiping away excess oil prevents it from pooling and making uneven patches on the surface. Begin with the low preheat and move to medium-low as directed. A pan that is too hot can set the batter before you have time to swirl it; a pan that is too cool can leave the surface slow to set. The goal is an evenly cooked flexible layer, not a crisp pancake with dark edges.
Step 4: Cook and turn the crepes
The batter amount is a starting point: about a third cup for the large pan and a quarter cup for the smaller one. What matters is a thin coating that reaches around the pan when you swirl. A thick puddle in the center makes a heavier layer and uses batter that was intended for several crepes. If a small gap appears, resist repeatedly pouring more over the whole surface. Evenness is more valuable here than an exact count of identical circles.
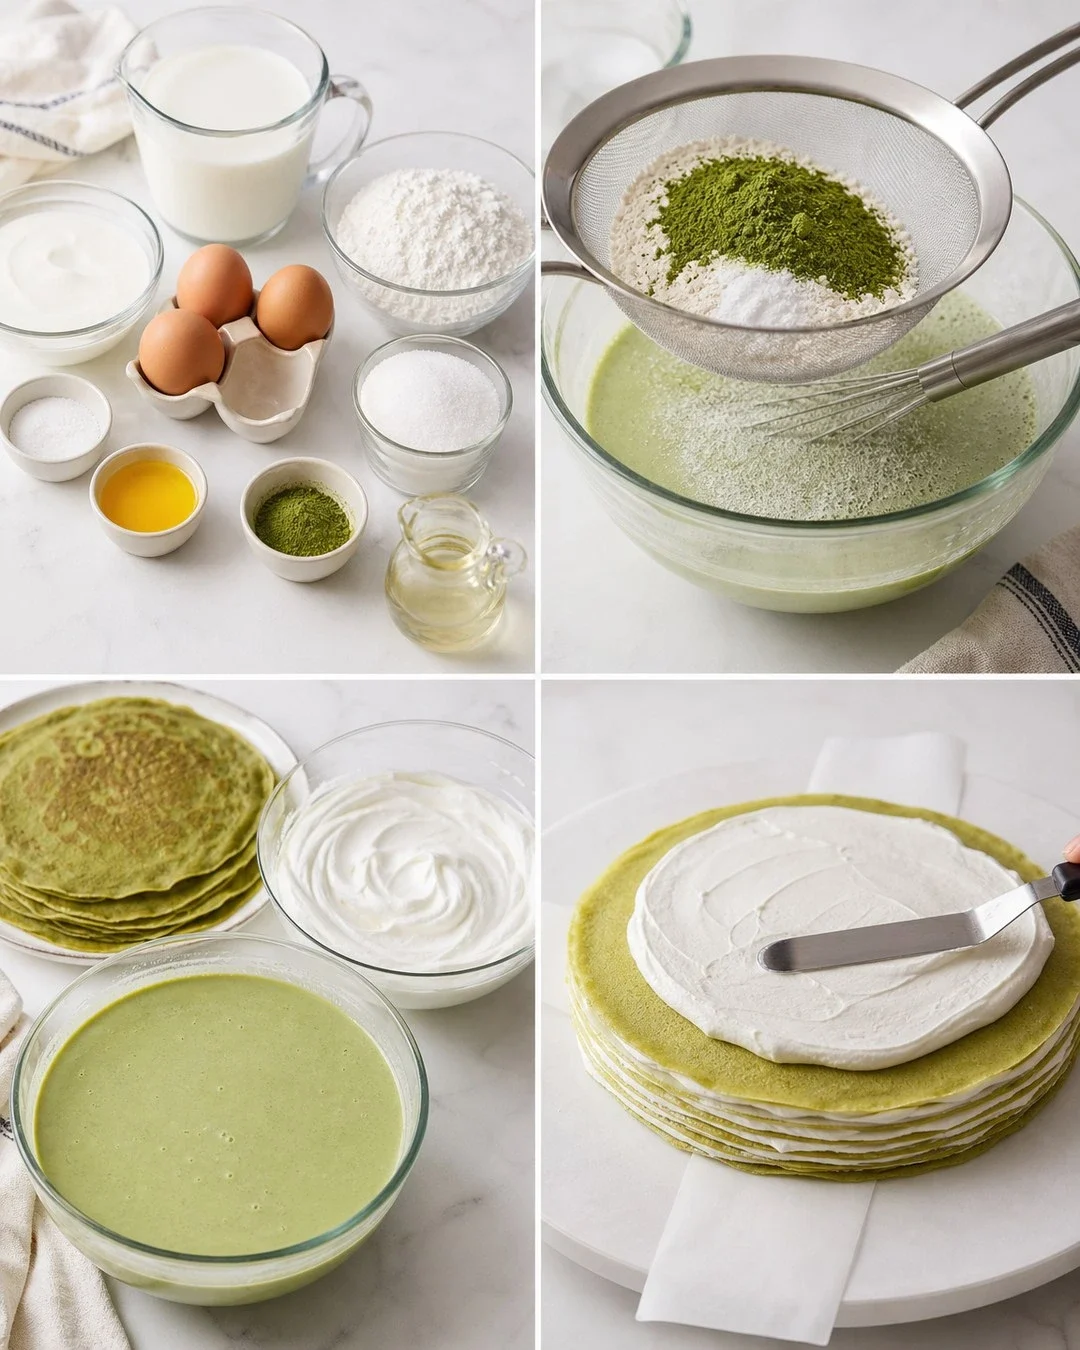
Look for the surface to set and the edges to release before flipping. The first side takes much longer than the second, which needs only a brief finish. Handle the edge gently so it doesn't tear under its own weight. The recipe aims for about thirteen smaller crepes, but thickness affects that number. A modest difference in count is easier to work with than deliberately making very thick final crepes to force a particular total. Let the layers cool fully before cream comes near them.
Step 5: Whip the cream until spreadable
Cold heavy whipping cream gives the filling its light structure. Add the sugar gradually while whipping, then stop at defined peaks whose tips gently bend. That texture spreads without running out of the cake, while still feeling soft against the crepes. Stiff, grainy cream is harder to distribute in a thin layer and can make the finished slices feel uneven. Watch the bowl as it thickens instead of relying on a fixed beating time.
Keep the cream chilled while the crepes finish cooling. Even a slightly warm crepe can soften the layer beneath it and make the stack harder to control. The optional extra whipped cream is for serving, not an invitation to use the main filling in thick cushions between every layer. Thin, consistent coverage is what gives the sliced cake its clear pattern. When spreading, support the crepe with the plate and work lightly so the blade doesn't drag or stretch it.
Step 6: Build the stack with its final shape in mind
The crossed parchment strips are handles for moving the cake, so make them wide enough to support the stack. Center the large crepe first, then keep the cream within an area about the size of the smaller crepes. Leaving its outer border bare lets it wrap around the final shape. On the smaller crepes, the narrow clean edge keeps cream from being pushed out as the weight of the next layer goes on.
Pause occasionally to look from the side. A mound of filling in one spot can create a sloping stack even when each crepe looks centered from above. Spread the cream evenly rather than pressing down hard to level the cake. This is assembly, not compression. Finishing with a crepe gives a clean base after inversion, and keeping the layers aligned makes it easier to move the whole stack into its lined dish without a last-minute attempt to straighten everything by hand.
Step 7: Shape and chill the cake
A shallow curved dish supports the sides while the cake rests. It needs to be large enough to hold the stack comfortably, rather than squeezing it into a narrow bowl. Plastic wrap lines the dish before the parchment handles bring the cake over. Once the strips are removed, the wrap can be gathered around the edges to encourage a rounded shape. Gentle support is enough; force would drive cream out of the layers you just arranged.
The two-hour minimum chill lets the cake settle so it can be unmolded and sliced more neatly. It does not replace the earlier cooling of the crepes. Unwrap and invert onto the platter only when the cake is ready, keeping the larger crepe on top as intended. Sift the finishing matcha over it rather than dropping powder directly from a spoon. A thin, even coating is easier to eat and lets the tea flavor complement the cream instead of landing as a dry patch on one slice.
Serving a cake made of soft layers
Slice while the cake is cold, using a clean knife and wiping the blade between cuts when cream builds up. The layers can shift if you push sideways, so a deliberate cutting motion is more useful than pressing with a blunt edge. Let each portion stand for about five minutes before serving as directed. That brief pause takes some chill from the cream while the remaining cake stays ready for tidy slicing.
The recipe yields eight to ten slices, which is a helpful guide when planning a dessert table. Refrigerate leftovers promptly and enjoy within the stated two to three days. Cover the cake without pressing wrapping into the matcha top if you want to preserve its appearance. I would plan the rest of the meal simply around a project like this. The pleasure is in taking time with one carefully built dessert, while the measured ingredients and planned portions keep the work purposeful.
I pay more attention to thin, cool crepes than perfectly matching edges. A modest layer of cream keeps the stack steady. Give the assembled cake its full chill, then wipe the knife between slices. That clean green-and-cream pattern is the finish I want, with just a little matcha dusted over the top.
Joy.Layer thin matcha crepes with lightly sweetened whipped cream, then chill for a neat, tender green-tea cake.
Tap each ingredient as it goes into your basket or bowl.
Follow the steps in order to make this recipe.
Warm the milk and 3 tablespoons sugar in a small saucepan until the sugar dissolves; do not boil. Beat the eggs in a bowl. Slowly whisk in the warm milk, followed by the melted butter.
Sift the cake flour, 2 tablespoons matcha and baking powder into the bowl in two additions. Whisk gently just until smooth, then strain through a fine sieve. Cover and refrigerate for at least 1 hour.
Warm a 12-inch nonstick pan over low heat, lightly oil it and wipe away excess oil. Increase to medium-low. Stir the batter before every crepe.
Add about ⅓ cup batter, just enough to coat the large pan thinly, and swirl. Cook for about 2 minutes until set and the edges release; gently flip and cook about 30 seconds more. Transfer to parchment.
Use a 10-inch nonstick pan for the remaining crepes, starting with about ¼ cup batter each. Oil lightly as needed and cook each side as above. Aim for about 13 smaller crepes; the exact count depends on thickness. Let all crepes cool completely.
Beat the cold cream, gradually adding 3 tablespoons sugar, until it holds defined peaks with tips that gently bend. Keep chilled; do not beat until grainy.
Cross two wide parchment strips on a plate. Center the large crepe on top. Spread a thin layer of cream over an area about the size of the smaller crepes, leaving the large outer border bare. Add a smaller crepe and spread a thin, even layer of cream over it, leaving a small clean edge. Repeat, finishing with a crepe.
Line a shallow curved dish large enough to support the crepe stack with plastic wrap. Use the parchment strips to move the cake into the dish, then remove the strips. Bring the wrap around the edges to round them gently without compressing the cream. Cover and refrigerate for at least 2 hours.
Unwrap and invert onto a platter so the large crepe is on top. Sift the remaining matcha over the cake. Slice while cold and let each portion stand for about 5 minutes before serving. Refrigerate leftovers promptly and enjoy within 2–3 days.
Layer thin matcha crepes with lightly sweetened whipped cream, then chill for a neat, tender green-tea cake.
Joy’s kitchen note · I pay more attention to thin, cool crepes than perfectly matching edges. A modest layer of cream keeps the stack steady. Give the assembled cake its full chill, then wipe the knife between slices. That clean green-and-cream pattern is the finish I want, with just a little matcha dusted over the top.