Time35 min prep (includes 10 min dough rest) + 18–22 min baking
Makes12 pretzels
CategoryAppetizers
Tastefully Planned,
Joyfully Cooked.

Shape soft pretzels with a jalapeño-cheddar topping for a chewy, savory bake. Includes dough cues, a brief baking soda bath and cheese timing.


A soft pretzel with a savory crown
These pretzels put the strongest flavors on the surface: jalapeño slices, sharp cheddar, a little coarse salt, and a tiny pinch of black pepper shared across the batch. Underneath is soft yeast dough with garlic powder mixed in. I like that arrangement because the bread remains recognizable while each bite gets some browned cheese and pepper. The topping doesn't need to be hidden inside the dough to feel generous.
The batch makes twelve pretzels, so plan the trays and the serving portions before mixing. The dough has a short rest before shaping, followed by a brief soda bath and baking in stages. None of those jobs is difficult on its own, but setting them in order keeps the counter from becoming crowded just when you need room to lift a wet pretzel from the pot.
Choose sharp cheese and decide the pepper balance
Sharp cheddar brings enough flavor that the measured topping can do its job without making a thick blanket. Shred it into pieces that scatter evenly and melt over the pretzel, keeping the topping easy to distribute. The listed range gives some flexibility, but begin by dividing what you have across the batch. There is no need for one tray to receive most of the cheese simply because it reaches the oven first.
Jalapeños vary in heat, so their appearance won't tell you exactly how bold a bite will be. Slice them evenly and distribute them with some space between pieces. If you prefer a gentler topping, removing seeds and the pale interior before slicing can be a useful choice, although the peppers can still be hot. Wash your hands and utensils after handling them, and keep those hands away from your eyes.
Step 1: Activate the yeast
The water for this instant-yeast dough is lukewarm, around the temperature in the method, rather than very hot. Whisk in the yeast and give it the brief covered pause before adding the other ingredients. Melted butter should have cooled slightly so it joins the dough comfortably. Keep the separate, larger portion of butter for brushing apart from the small amount that belongs in the dough.
Salt, sugar, and garlic powder season the bread itself, so the crown isn't carrying every bit of flavor. Measure the garlic powder rather than reaching for a much larger shake because it seems small beside the flour. A balanced dough gives the cheddar and peppers a place to stand. I prefer using the ingredients already in the formula with care to adding more seasonings that compete with the topping and complicate the shopping list.
Step 2: Add flour in stages and keep the dough soft
Begin with the first flour additions, then work toward the amount that brings the dough together. Spooned-and-leveled flour or the listed weight gives you a clearer starting point than a firmly packed scoop. The goal isn't to use every speck of the maximum flour if the dough already has the right feel. A dough that is slightly tacky can still become smooth through kneading.
Use the small extra additions described when sticking is a problem. Large handfuls of flour can make the dough easy to roll for a moment but leave the baked pretzel dense. Keep a little flour on the work surface rather than burying the dough. Scrape under it when necessary, and give the hook or your hands time to work before deciding that more dry flour is the only answer.
Step 3: Knead, then use the short rest well
The kneading stage develops enough elasticity for long ropes that hold a twist. Press the dough and look for a slow spring back, then stretch a small piece to check whether it can thin without breaking immediately. The texture should remain soft. A smooth photograph of dough is less useful than feeling whether it stretches and holds together while you work with it.
Cover for the ten-minute rest so the surface doesn't dry. That pause gives you time to prepare the soda bath and organize the trays. If using the overnight refrigerator option, keep the dough tightly covered as the method directs and allow yourself flexibility when shaping cold dough. The rest is a real part of preparation, not empty time to erase because the dough looks ready to be cut.
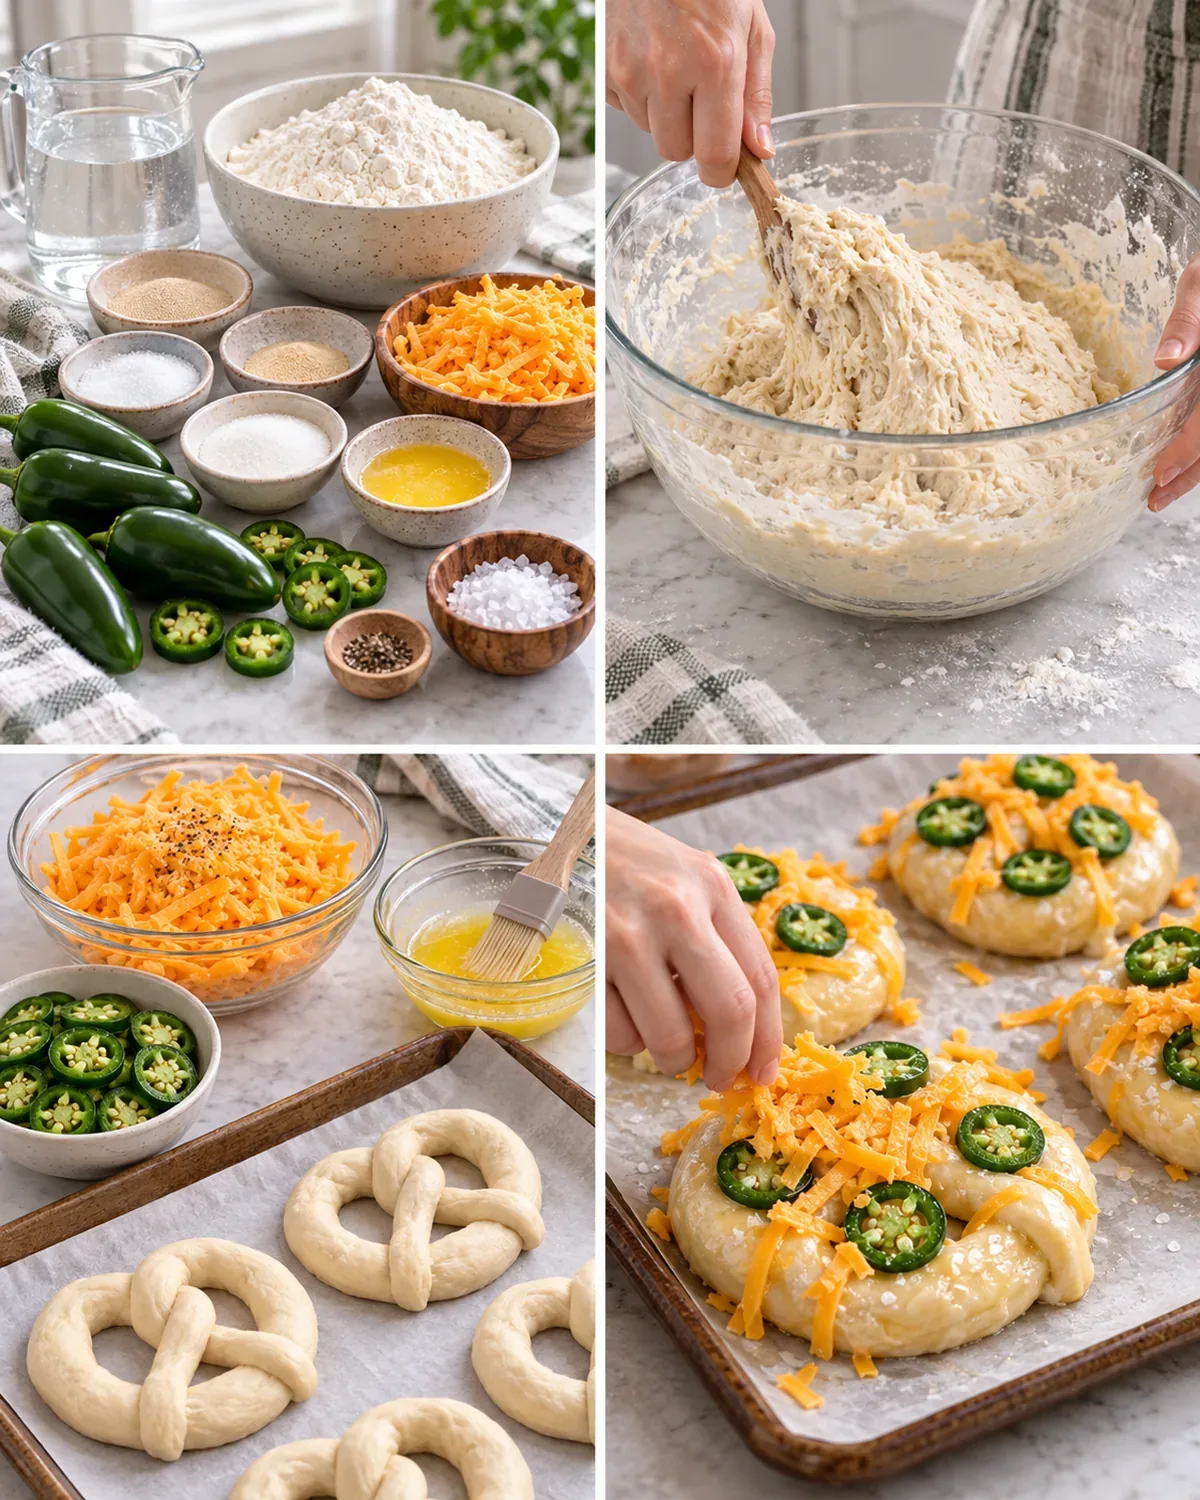
Step 4: Shape ropes that can keep their curves
Divide into reasonably even portions so the twelve pretzels bake at a similar pace. Roll outward from the middle, gradually lengthening each piece into the rope in the method. If a rope springs back sharply, a brief pause can make it easier to continue than pulling hard at the ends. Keep unused portions covered while you focus on the one in front of you.
Make the U, cross and twist the ends, then fold them onto the curve and press to secure. Leave visible openings rather than squeezing the shape into a solid knot; the dough expands in the bath and oven. The end attachments should be firm enough to survive lifting. A slightly uneven homemade shape is fine, but a loose tip deserves attention before it meets boiling water and becomes more awkward to reposition.
Step 5: Give the shaped pretzels a brief baking-soda bath
The baking soda and measured water create the treatment that gives these pretzels their characteristic surface. Use a roomy pot with space above the liquid, and lower only one or two shapes at a time as directed. Have the slotted spatula ready before the first pretzel goes in. Trying to locate a lifting tool while the dough continues bathing makes a short step needlessly hurried.
Keep the dip within the twenty-to-thirty-second window. A longer soak isn't a shortcut to better color and can leave an unpleasant flavor. Lift with enough support that the soft loops don't stretch, allow excess liquid to drain, and place on the prepared nonstick surface. Silicone mats or greased parchment matter here because dipped dough can cling much more stubbornly than a dry piece of shaped bread.
Step 6: Build the topping in the right order
Brush the drained pretzels with the melted topping butter, then gently press on the jalapeño slices and sprinkle coarse salt. Salt with the cheese in mind: the cheddar will bring its own savory flavor later. Keep the tiny measured pinch of black pepper for the entire cheese topping rather than treating it as a per-pretzel amount. Mixing it through the shredded cheese helps distribute it.
The cheddar goes on after the first portion of baking, which gives the dough a head start before the cheese melts and browns. Scatter it over the pretzel's surface rather than leaving most in the holes or on the tray. Some escaped cheese can brown around the edges, but the useful topping is the part attached to the bread. Return the tray for the remaining bake and look for golden dough and melted cheese together.
Step 7: Serve warm with a meal in mind
Let the finished pretzels settle briefly on the tray before lifting so the hot cheese has a moment to hold its place. They are lovely warm, when the inside is soft and the crown still smells of cheddar and pepper. A separate dip is optional rather than necessary; there is already plenty happening on the surface. If you do serve one, a small bowl on the side keeps everyone free to choose.
A pretzel can accompany soup or a vegetable plate instead of becoming a meal built entirely around bread and cheese. Think about what makes sense for the occasion and the rest of the day. For groceries, this can also be a useful place for cheddar that already has another destination in the week. Buying one cheese for several planned meals is more practical than accumulating a different block for every snack and dinner.
Keep the remainder pleasant to eat
Follow the recipe's covered storage choices for the remaining pretzels, and label the container so the batch is easy to use. Let them cool before closing a container tightly; trapped steam softens the surface. Separate stacked pretzels gently so the cheese crown doesn't peel away from the bread underneath. If only a few are needed for the first meal, put the rest away rather than leaving the whole tray out indefinitely.
Reheat the portion you want, using the brief microwave or oven option in the method. The microwave gives a softer result, while the oven can refresh the exterior somewhat; either can dry the bread if carried on too long. Keep an eye on the cheese as it warms. A planned second serving with soup or leftovers makes twelve feel like a useful batch, while heating all twelve again simply creates more warm bread than you intended to serve.
My children don't want the same amount of heat, so I like leaving some room to choose with the toppings. Keep jalapeños easy to see and make a milder portion if needed. Smoked cheddar or a pinch of smoked paprika in the finishing butter gives the pretzels another savory direction. That little flexibility is useful at our family table and at a work potluck, too.
Joy.Shape soft pretzels with a jalapeño-cheddar topping for a chewy, savory bake. Includes dough cues, a brief baking soda bath and cheese timing.
Tap each ingredient as it goes into your basket or bowl.
Follow the steps in order to make this recipe.
Whisk yeast into warm water in a large bowl or mixer bowl. Cover and leave for 1 minute.
Mix in salt, garlic powder, sugar and melted butter. Add 3 cups flour in 1-cup (125 g) portions, using a spoon, spatula or dough hook. Mix in another ¾ cup for about 1 minute. If needed, add a further ¼–½ cup to bring the sticky dough together.
Knead by hand on a floured counter or with the dough hook for 5 minutes. If it sticks, add flour in teaspoon portions rather than large handfuls. The dough should stay soft and slightly tacky, springing back slowly when pressed. A small piece should stretch thin enough to let light through without tearing; knead longer if it breaks immediately.
Shape a ball and cover with a clean towel for a 10-minute rest. Alternatively, cover tightly and refrigerate up to 1 day. You can prepare the baking-soda bath during this rest.
Heat the oven to 400°F (204°C). Prepare 2 trays with silicone baking mats or greased parchment so the dipped dough releases cleanly.
Divide the dough into portions of about ⅓ cup (75 g). Roll each into a 20–22-inch rope. Make a U, cross and twist the ends together, then fold them down onto the curve and press to secure the pretzel shape.
Bring the baking soda and 9 cups water to a boil in a roomy pot.
Lower 1–2 pretzels into the bath for just 20–30 seconds; a longer dip can leave an unpleasant flavor. Lift with a slotted spatula, drain and place on the prepared tray. Brush with melted butter, gently press on jalapeño slices and sprinkle coarse salt. Repeat. Boiled, unbaked pretzels can be covered and refrigerated up to 24 hours.
Bake 10 minutes. Mix the 1/16 teaspoon black pepper into the shredded cheddar for the whole batch, then sprinkle each pretzel with 2–3 tablespoons of the cheese. Bake another 8–12 minutes, until the bread is golden and the cheese has melted.
Let the pretzels settle briefly on the tray, then serve while warm.
Keep leftovers covered for up to 1 day at room temperature or 1 week refrigerated. For a softer bite, microwave briefly or warm in a 350°F (177°C) oven for about 5 minutes.
Shape soft pretzels with a jalapeño-cheddar topping for a chewy, savory bake. Includes dough cues, a brief baking soda bath and cheese timing.
Joy’s kitchen note · My children don't want the same amount of heat, so I like leaving some room to choose with the toppings. Keep jalapeños easy to see and make a milder portion if needed. Smoked cheddar or a pinch of smoked paprika in the finishing butter gives the pretzels another savory direction. That little flexibility is useful at our family table and at a work potluck, too.