Time20 min prep + 80–100 min baking + cooling and 15 min chilling
Makes20–24 servings
Recipe notesRead before cooking
Tastefully Planned,
Joyfully Cooked.

Two spiced pumpkin Bundt cakes become one cheerful Halloween centerpiece, with orange frosting, a green cone stem and an optional candy-filled surprise.

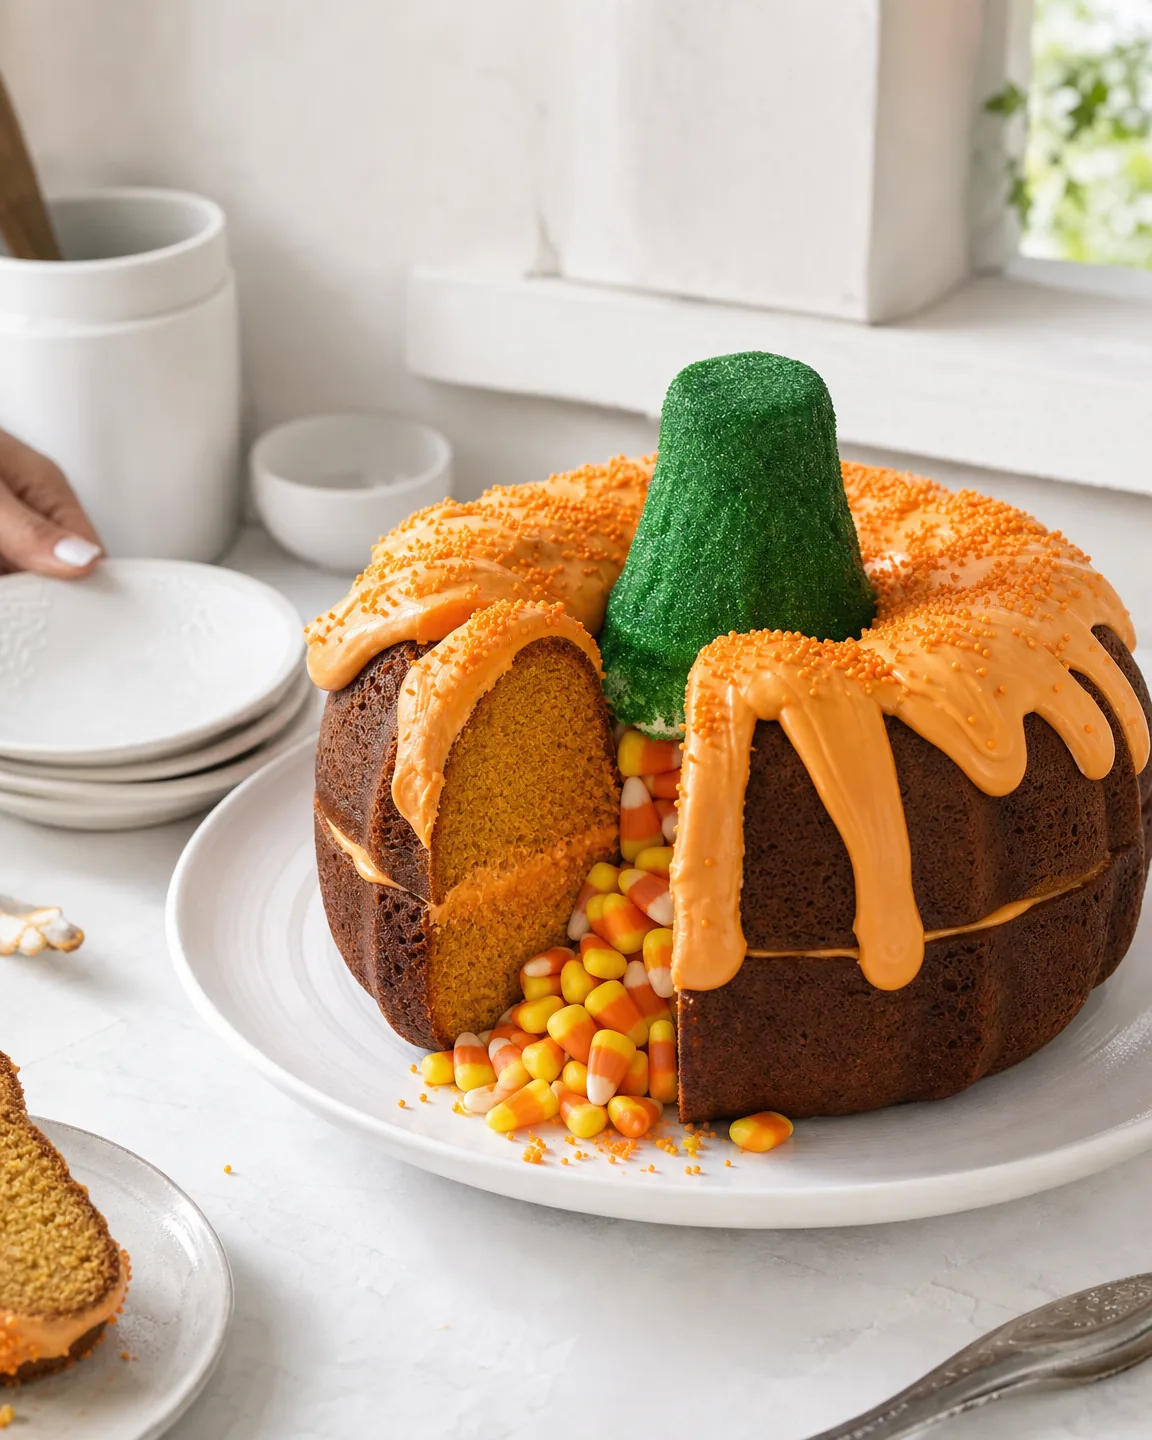
A pumpkin shape built from two cakes
The pumpkin in this dessert comes from both the batter and the shape. Two Bundt cakes meet in the middle, orange frosting runs over their ridges, and a green-frosted ice cream cone becomes the stem. I like the playful logic of it. Familiar baking ingredients create a centerpiece with a clear seasonal idea, and the decoration doesn't demand tiny piping details or a collection of specialty tools to explain what it is.
This is also a generously sized project, with twenty to twenty-four servings. Before you begin, choose the platter, make room for cooling and consider when the cake will be sliced. Two cakes need two full rounds of baking if you use the single pan in the recipe, followed by complete cooling before stacking. The eighty to one hundred minutes of baking describes those rounds together. Allow a separate stretch for complete cooling so both cakes are ready to frost and stack securely.
Step 1: Divide the ingredients into two batches
The ingredient list supplies both cakes, but the method mixes them one at a time. Setting out two groups makes that division easier to follow: one box of cake mix, one box of instant pudding mix and the appropriate share of eggs, pumpkin, oil, sour cream, spice, vanilla and water for each. It is a simple way to avoid putting the full two cups of pumpkin into the first bowl while the second cake is still waiting.
White or yellow cake mix is the intended base, with instant vanilla or pumpkin pudding mix as the companion. These are used as the dry mixes in this recipe, not prepared separately according to their boxes. The eggs, water and other additions are already supplied in the cake's method. Following both the box additions and the recipe additions would change the batter substantially. Read through the measured batch before mixing so the convenience ingredients stay convenient rather than creating two competing sets of directions.
Pumpkin adds more than a seasonal name
Pumpkin puree brings moisture and flavor to the batter, while pumpkin pie spice supplies the familiar warm aroma. Plain puree is the listed ingredient; sweetened pie filling would bring other ingredients and a different balance. Sour cream and oil contribute richness, and the eggs help the cake hold its shape. The pudding mix is another part of this particular batter, so don't leave it out because the cake mix already seems like a complete starting point.
Low-speed mixing is enough to bring everything together. Scrape the bowl's sides and bottom, where pockets of dry mix can remain under a seemingly smooth surface. The batter needs to be evenly incorporated, not whipped for extra volume until the texture changes. I like putting the rubber spatula beside the mixer before starting because scraping is easy to forget once the top looks uniform. A consistent batter gives the ridged cake a better chance of baking evenly from one section to another.
Step 2: Prepare the pan as carefully as the batter
A twelve-cup Bundt pan gives this recipe its size and contour. Generously grease it as directed, paying attention to grooves and the center tube rather than coating only the broad open areas. The shape is part of the decoration, so clean release matters. There is little benefit in saving a moment on pan preparation and then having to disguise a section of cake left in a dry corner of the pan.
Smooth the batter's top after filling so it begins baking at a reasonably even depth. The cake will rise, but it cannot be expected to correct every mound and hollow on its own. Use the specified pan capacity rather than assuming every decorative tube pan is interchangeable. A much smaller pan can hold the batter at the wrong depth or leave too little room. This project already has plenty of visual interest from two matching cakes; a reliably sized pan is more useful than a more elaborate shape with uncertain capacity.
Step 3: Bake, cool and release the cakes
Each cake bakes for forty to fifty minutes at 350°F, with a tester in the center used to check readiness. Choose a deep part of the cake rather than a thin outer edge. The tester should come out clean as the recipe describes. A browned surface can arrive before the thick center is ready, so color alone isn't enough. Check toward the stated time and let the cake's actual condition decide when it leaves the oven.
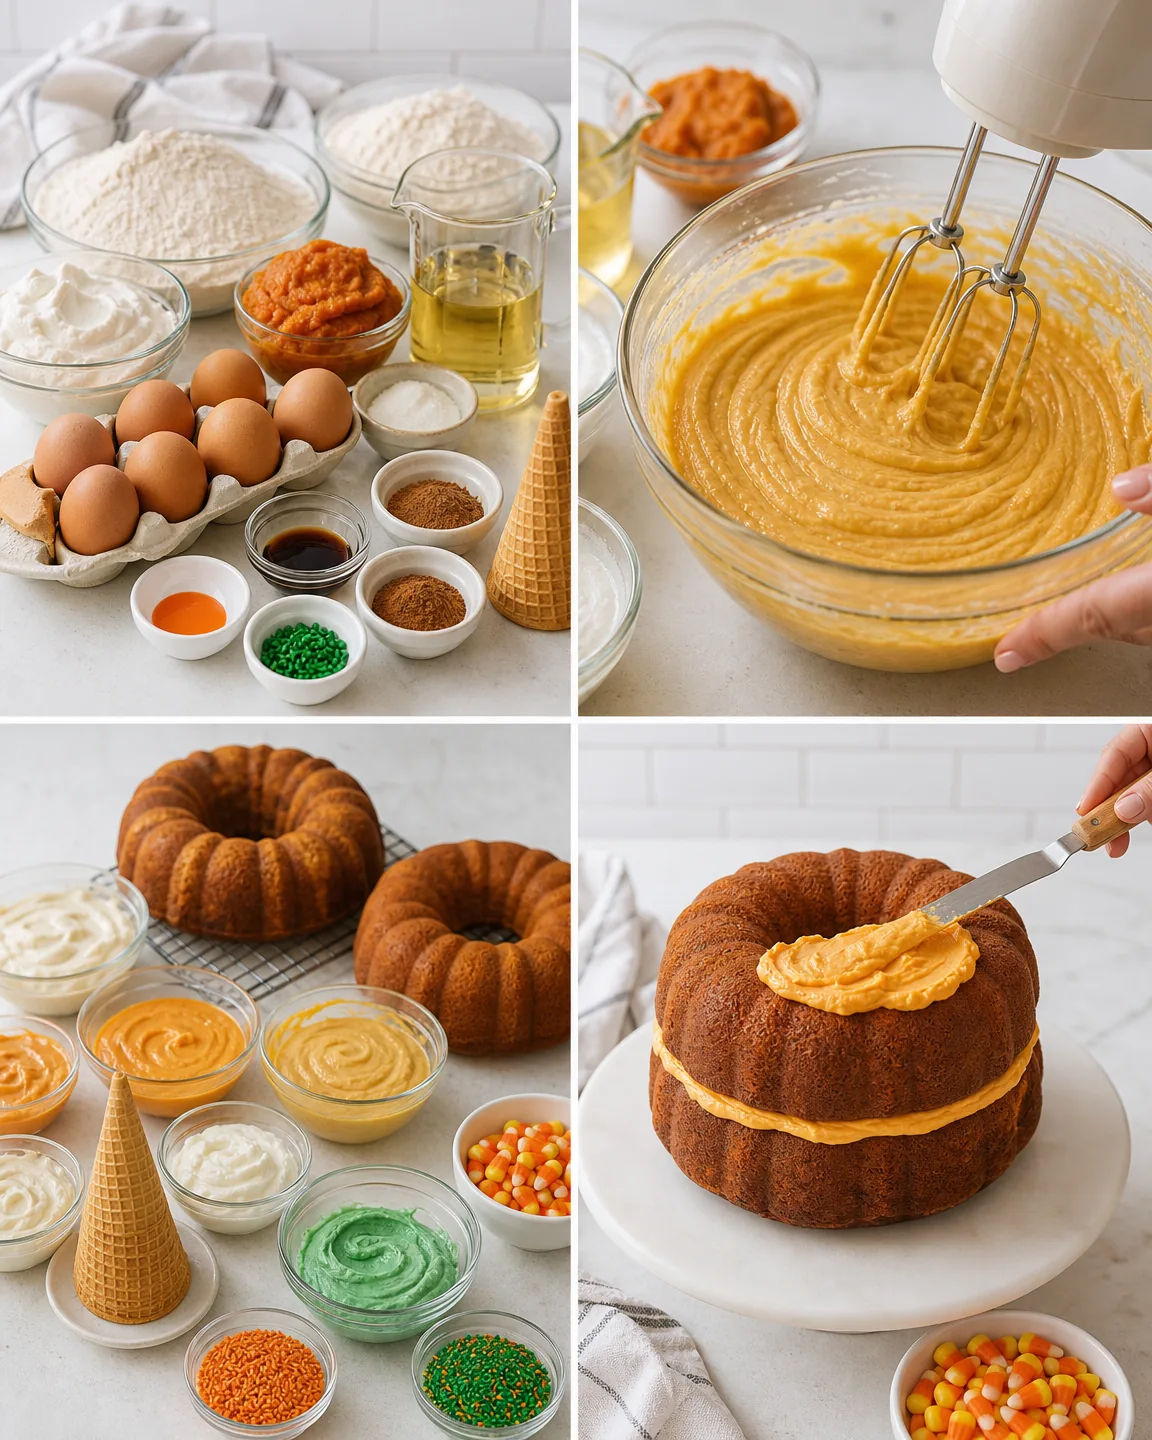
The fifteen-minute rest in the pan comes before turning the cake onto a wire rack. That interval is different from complete cooling, which happens afterward. Have the rack ready and invert deliberately with protected hands. Before starting the second cake, wipe out and grease the pan again. The first coating isn't a promise that the next cake will release equally well. Repeat the same measured process, then leave both cakes until they are fully cool; frosting a warm surface would make the later stack harder to manage.
Step 4: Level the cakes for a stable middle
The rounded bottoms are leveled with a large serrated knife so the two cakes can meet more evenly. Work on cool cakes and remove only what is needed for a stable fit. A slight unevenness can create a tilt that becomes more obvious after the upper cake goes on. The trimmed pieces do not need to go to waste, but they should be removed from the assembly area so crumbs don't become mixed through the frosting between the layers.
The first cake goes on the platter smooth side up, with the measured portion of orange frosting spread over it before the second cake is aligned. Think about how the ridges meet as well as whether the center holes line up. If supports are needed, use only the food-safe dowels or straws listed, trimmed to fit. Keep track of every support. They are structural tools rather than edible decoration, and they all need to be removed before slicing and serving.
Step 5: Separate the frosting before decorating
This recipe divides the frosting among the orange middle and exterior, plus the green stem. Keep the reserved three tablespoons for green in their own bowl before coloring the orange portion. Stir color in gradually until it looks right to you. The pumpkin shape does much of the visual work, so the orange doesn't need to become intensely dark to make the idea clear. A consistent color through the frosting is more helpful than trying to correct streaks after pouring.
The brief chill after stacking gives the cake a pause before the dripping finish. Use that interval to frost the cone green and add optional green sprinkles. The cone is a cake-style ice cream cone as listed, giving the stem a shape that can sit upside down on the top. Prepare it where it won't be knocked over while you move the cake. Small practical details like a clear landing place keep the decorative steps from feeling more delicate than they need to be.
Step 6: Warm the orange frosting until pourable
The remaining orange frosting is warmed in very short microwave bursts, stirring between them, until it is just pourable. The three-second intervals help because the change from thick to runny can happen quickly. Warm it only enough to flow; a hot, thin liquid would rush down the ridges and collect on the platter instead of leaving controlled drips. Check the consistency after each stir rather than assuming a particular total time always behaves the same way.
Pour slowly around the cake in a circular motion and watch how the frosting travels. You can add a little more where needed, but taking it away after a large flood is much harder. The ridges naturally guide the drips, which is part of the appeal of using Bundt cakes. Optional orange sprinkles can go on while the coating is receptive. Leave room to see some contour: the cake's pumpkin shape is strongest when the frosting follows the ridges rather than filling every groove into a smooth cylinder.
Step 7: Add the stem and final decorations
Halloween candy in the center and sprinkles are optional. Add them if they suit the gathering and what you already have for decorating. The green cone stem completes the shape even without a candy-filled middle. Set it in place after the exterior is finished, then look at the whole cake before adding more. A recognizable pumpkin needs surprisingly few elements. Leave enough clear space for comfortable slicing, adding extra decoration where it will be easy to serve.
Before cutting, remove every dowel or straw and account for them. Separate the decorative stem and any loose candy so the knife can move cleanly through the cake. The twenty to twenty-four portions allow a modest slice for a larger group, especially when other food is being served. Follow the frosting product's storage guidance, particularly if you chose cream cheese frosting, and cover leftover cake appropriately. Planning who will share such a large dessert is part of the recipe for me: the cheerful centerpiece feels most satisfying when its generous size has a purpose.
Chill the assembled cake before adding the cone so the frosting has time to set and the colors stay crisp. Keep the orange frosting only just warm enough to pour; short microwave bursts give you more control over the drips. I’d keep the green stem until the final decorating step. Check for every support straw or dowel before serving, and follow the frosting label’s storage directions.
Joy.Two spiced pumpkin Bundt cakes become one cheerful Halloween centerpiece, with orange frosting, a green cone stem and an optional candy-filled surprise.
Tap each ingredient as it goes into your basket or bowl.
Follow the steps in order to make this recipe.
Heat the oven to 350°F. Generously grease a 12-cup Bundt pan. On low speed, beat together 1 box cake mix, 1 box pudding mix, 4 eggs, 1 cup pumpkin puree, 1/3 cup oil, 1/4 cup sour cream, 1 1/2 teaspoons pumpkin pie spice, 1 teaspoon vanilla and 1/2 cup water. Scrape the bottom and sides of the bowl and mix again to incorporate everything.
Transfer the batter to the prepared Bundt pan and smooth the top with a rubber spatula.
Bake for 40–50 minutes, until a tester inserted into the center comes out clean. Let the cake cool in the pan for 15 minutes, then invert onto a wire rack and cool completely.
Wipe out and grease the pan again. Repeat the mixing and baking process with the remaining box of cake mix, box of pudding mix, 4 eggs, 1 cup pumpkin puree, 1/3 cup oil, 1/4 cup sour cream, 1 1/2 teaspoons pumpkin pie spice, 1 teaspoon vanilla and 1/2 cup water. Cool completely.
Put 1 3/4 cups frosting in a heatproof 2-cup measuring cup. Stir in orange food coloring until you reach the shade you want.
With a large serrated knife, level the rounded bottoms of the cooled cakes. Place one cake on a platter with its smooth side facing up. Spread 3/4 cup of the orange frosting over it, then stack the second cake so the edges align. Add food-safe dowels or straws if needed, trimming them to fit. Chill for 15 minutes.
Mix the reserved 3 tablespoons frosting with green food coloring. Spread over the ice cream cone and add green sprinkles, if using.
Microwave the remaining orange frosting in 3-second bursts, stirring between each, until just pourable, about 10 seconds total. Slowly pour around the cake in a circular motion for a drip effect. Add orange sprinkles, if using.
Fill the center holes with Halloween candy, if desired. Set the green-frosted cone upside down on top as the stem. Remove any dowels or straws before slicing and serving.

Cozy sauce, bright vegetables, one very happy bowl.
Crunch first. Then comes the wow.
Proof that a little lemon can change your whole lunch.
Two spiced pumpkin Bundt cakes become one cheerful Halloween centerpiece, with orange frosting, a green cone stem and an optional candy-filled surprise.
Joy’s kitchen note · Chill the assembled cake before adding the cone so the frosting has time to set and the colors stay crisp. Keep the orange frosting only just warm enough to pour; short microwave bursts give you more control over the drips. I’d keep the green stem until the final decorating step. Check for every support straw or dowel before serving, and follow the frosting label’s storage directions.