Time5 min prep · no cooking
Makes2 small drinks
CategoryDrinks
Tastefully Planned,
Joyfully Cooked.

Whip instant coffee, sugar and hot water into glossy dalgona coffee foam. Spoon it over milk and ice for a creamy two-layer coffee drink.

A small coffee break, thoughtfully made
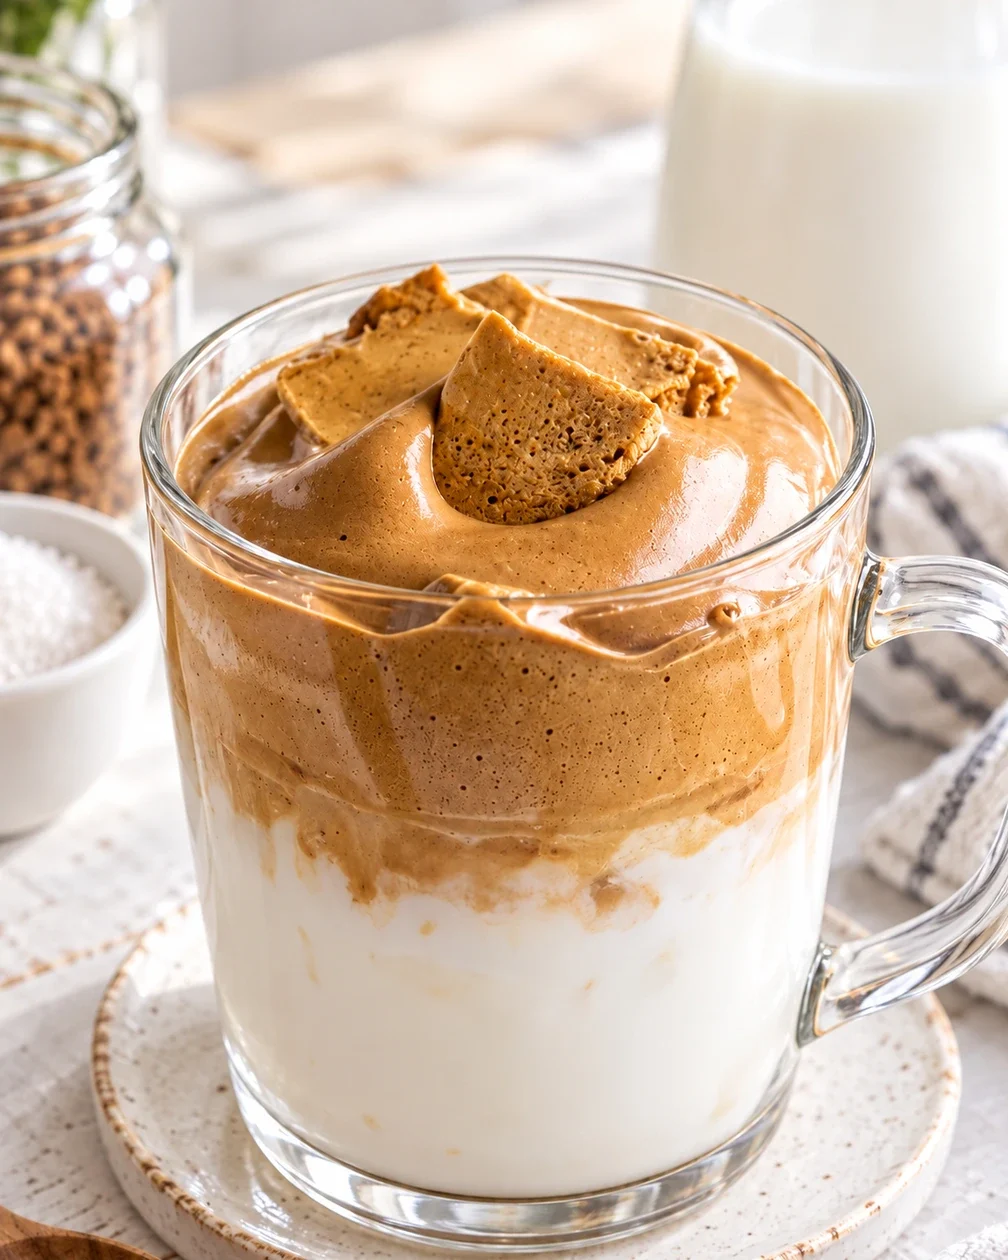
The first thing you notice is the contrast: pale milk underneath, a thick sweep of coffee foam above it, and a spoon waiting to bring them together. Dalgona coffee makes a few ordinary cupboard ingredients feel quite different. I like how a little attention to texture makes these familiar ingredients feel like a treat. It can be a small treat without becoming another complicated kitchen project.
My mornings begin with school lunches and my husband's lunch, so a coffee moment fits around the practical work of feeding people. That doesn't mean every morning needs a beautifully layered drink. This is an option for a moment when whisking a little foam sounds enjoyable. The recipe makes two small drinks, which is worth knowing before you reach for the biggest glasses in the cupboard.
The topping is concentrated coffee, not a bowl of lightly flavored whipped cream. Its strong taste makes more sense once it meets the milk. You can admire the layers, then stir them without worrying that you've spoiled the presentation. A comfortable, balanced sip matters more to me than keeping a photograph-perfect stripe between the two layers.
Where the Korean inspiration belongs
The name connects the drink to dalgona, the Korean sugar candy whose caramel color and airy appearance the foam recalls. The whipped coffee topping and the candy are different preparations. The coffee foam is made without cooking sugar. Add a piece of the candy on top if you enjoy that finish, or serve the drink simply with its whipped topping.
Growing up in Seoul and now making a home in America gives me an interest in the way familiar flavors appear in different forms. Here, that cultural connection can stay simple: understand the name, enjoy the texture, and make the drink in a way that suits your kitchen. There is no need to turn one glass into a claim about how every Korean household drinks coffee.
If you choose the optional candy garnish, use a separate candy recipe and treat it as another task. The written coffee method does not provide the measurements or cooking instructions for candy. For a quieter version, leave it off entirely. The milk and whipped coffee already provide the main contrast, and skipping an extra garnish can be the most practical choice.
Why these three ingredients form the topping
Use plain instant coffee for the foam. Instant coffee is made to dissolve in water; a spoonful of ground coffee is a different ingredient and will leave grounds behind. A shot of brewed espresso also changes the concentration and amount of liquid. Keeping the specified ingredient is more useful than trying to rescue a mixture that began with a different kind of coffee.
The equal spoonfuls of instant coffee, white granulated sugar and hot water give you a clear starting point. Sugar is part of the foam's structure as well as its sweetness. Reducing it dramatically is not simply a less-sweet version of the same process: the topping may hold differently. If you want to experiment later, keep that distinction in mind rather than expecting the original texture unchanged.
A three-in-one coffee sachet brings its own sugar, creamer and other ingredients into the bowl. That makes it difficult to know what proportions you are actually whisking. Plain granules keep the small ingredient list understandable. You don't need a new specialty jar for each attempt, but you do need to check what the jar you already have actually contains.
Choose the milk for the drink you want
The ingredient list leaves room for different milks, and that choice is a useful place to adapt the drink. A fuller-bodied milk makes the finished coffee feel richer; a lighter milk lets the topping taste more pronounced. Plant milks have their own flavors, too. Think about what you enjoy drinking on its own, because that flavor will still be present underneath the coffee.
The foam is whipped separately from the milk, so this isn't a recipe that depends on the milk itself frothing. That makes the base more flexible than the topping. An unsweetened milk can help you judge the sweetness coming from the measured sugar, while an already sweetened milk adds another layer of sweetness. Read the carton before adding anything else to the glass.
One cup of milk is divided between two small glasses in the written recipe. Choose glasses with enough room for the foam and for a spoon to move through both layers. If you prefer a gentler coffee flavor, extra milk is an easy adjustment at serving. There is no reason to make a larger batch of concentrated topping just to fill a tall glass.
Step 1: Set up the bowl before you start whisking
A roomy mixing bowl gives the whisk somewhere to travel. A very narrow cup may contain the ingredients, but containment alone doesn't make it a comfortable place to work air through them. Set out the whisk, measuring spoon and serving glasses before mixing. This is a small recipe, yet having the few pieces ready makes the process feel much less stop-and-start.
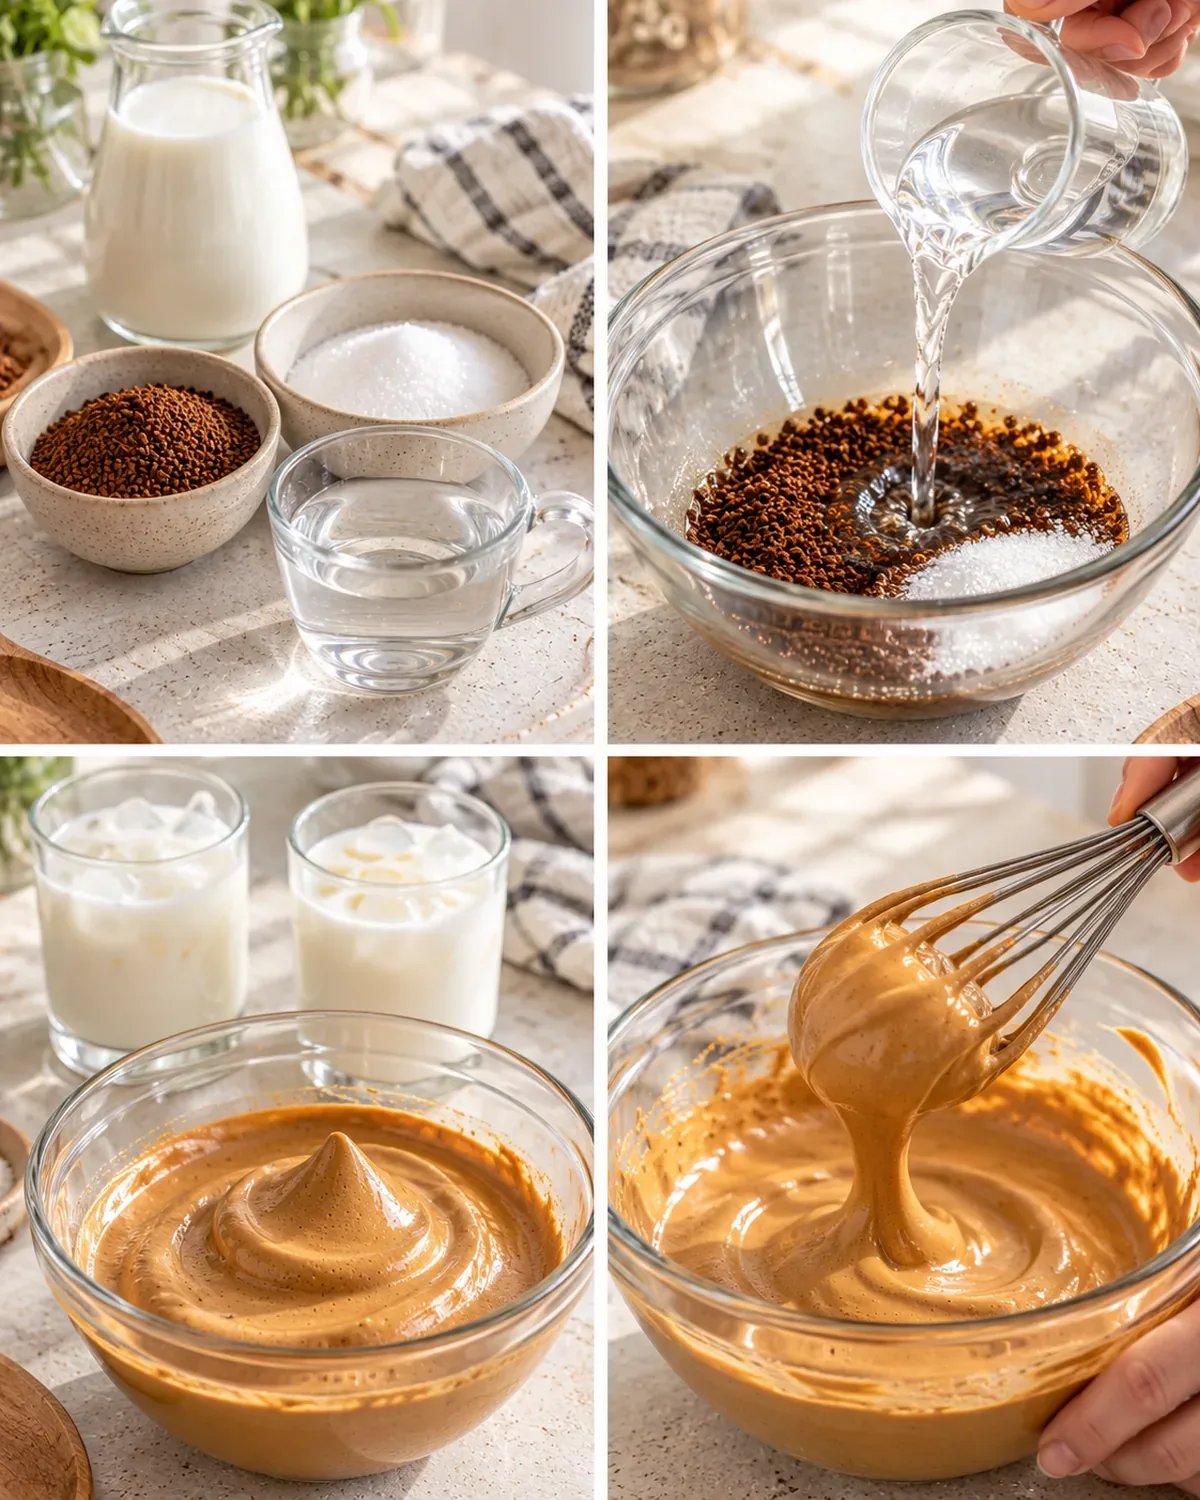
Begin by stirring the hot water, coffee and sugar together so the granules dissolve. Look along the bottom of the bowl, where an unmixed patch can hide. The mixture should be evenly dark rather than a collection of dry pockets surrounded by liquid. Starting with a smooth mixture helps you distinguish the later change in texture from ordinary lumps that never dissolved.
Keep the bowl stable on the work surface. If it slides, a folded damp towel underneath can make the whisking more comfortable. Tilt the bowl slightly as described in the method, keeping the mixture gathered where the whisk can reach it. A rounded whisk is better suited to incorporating air than a spoon or fork, even when those utensils are closer to hand.
Step 2: Whisk until the foam holds its shape
At first, the mixture is dark and loose. As you whisk, it becomes lighter in color and thicker, with more visible volume. That change gives you information you can use while you work. A fixed number of whisk strokes cannot account for the size of a whisk, the bowl shape or the speed of the person holding it, so the written method uses texture as its guide.
Lift the whisk and look at the trail it leaves. A mixture that immediately levels into a flat puddle isn't at the same stage as one that keeps a distinct mound. You're looking for glossy foam that holds a firm peak. Check the whole bowl, including the thinner mixture along its sides, so a small thick patch doesn't persuade you to stop before the rest is ready.
Whisking by hand can take several minutes and may take longer than the quick preparation label suggests for your particular setup. That's a useful expectation to have, not a reason to rush. A short pause to adjust your grip is fine. If hand whisking is uncomfortable or tiring, the mixer alternative in the recipe gives you another way to reach the same visual endpoint.
Using a mixer without turning the clock into a promise
With a mixer, begin on low so the liquid ingredients combine before the beaters send them up the bowl. Once the mixture is dissolved, increase the speed and watch the surface change. Keep the beaters in contact with the mixture, moving them enough to reach the edges rather than working one small circle while a loose ring remains around it.
The method suggests beginning to check around a minute and a half, but that is a checkpoint rather than a guarantee. Mixer power, beater shape and bowl size all affect how quickly the small quantity thickens. Stop to look at the foam instead of continuing simply because another appliance took a certain amount of time. The firm, glossy peak is the useful comparison.
A tiny batch can be awkward if the beaters barely reach the ingredients. Use a bowl that is roomy enough to whisk in but still gathers the mixture within reach. Don't add unmeasured water just to raise the liquid level. That solves the reach problem by changing the recipe. Choosing a better-fitting bowl is the more direct adjustment.
Step 3: Build the layers, then make the drink pleasant to sip
Have the milk cold and the glasses ready when the foam reaches its finished texture. Divide the milk as written, adding ice if you want it, before spooning on the coffee. Putting the ice in first avoids pushing cubes through a carefully placed mound afterward. Lower spoonfuls onto the surface gently, leaving enough space at the top that stirring won't send the drink over the rim.
The first taste of unmixed foam can seem much stronger and sweeter than the finished glass. Before changing the recipe, stir some of it into the milk and taste that combination. This helps you decide whether you want more milk rather than responding to the concentrated topping as though it were meant to be drunk alone. You can keep a little foam visible while mixing the layers underneath.
Cocoa or cinnamon can provide an optional finish, as the method and kitchen note suggest. Use a light touch so the coffee remains the main flavor and loose powder doesn't overwhelm the surface. Garnishes are a choice, not a measure of how complete the recipe is. A plain glass with smoothly mixed coffee and milk is just as valid as one with a decorative topping.
If the topping stays loose or the drink tastes too strong
If the mixture is slow to thicken, check the simple things first: plain instant coffee, equal measured spoonfuls, dissolved sugar, and a whisk or beaters that actually reach the mixture. Continuing to whisk cannot reliably correct the wrong ingredient or an accidental extra pour of water. Avoid adding more of several ingredients at once, because it becomes difficult to tell which change helped.
Foam that has sat for a while may settle and look less lofty. That is different from a fresh mixture that never whipped. Stir or whisk a reserved small amount again before assembling, and use its texture to decide whether it is ready. Keeping the milk and foam separate until serving makes this adjustment easier than trying to revive the topping after it has spread through a full glass.
If the finished drink is too intense, add milk a little at a time and stir before tasting again. Decaffeinated instant coffee is a possible option when choosing your ingredients, but products can whip differently, so don't promise yourself identical results from every jar. This is still a coffee drink with a sweetened topping; its pretty layers don't change what the measured ingredients contribute.
Plan the small treat without creating extra work
For the lightest texture, make the foam close to the time you plan to serve it. You can set out clean glasses and measure the dry ingredients beforehand, keeping the hot water step for when you begin. That small bit of organization is often enough. Preparing a large jug of finished milk coffee in advance gives up much of the fresh contrast that makes this particular drink enjoyable.
If you have a small amount of foam left, keep it covered and refrigerated separately, recognizing that it may settle and need whisking again. Keep milk chilled until you use it, and don't treat a partly sipped glass as an ingredient for the next drink. The practical goal is to make the amount you want, rather than finding a reason to use every possible container in the kitchen.
A warm version is another serving choice: warm the milk gently without boiling, then add the foam just before drinking. Choose warm or cold because it suits the moment, not because one presentation is more correct. At my table, a little planning should leave room for enjoyment. Here that can mean two small glasses, a short ingredient list, and permission to stir the lovely layers together.
My mornings start with school lunches and my husband's lunch, so I like a small coffee moment that feels a little different. A pinch of cocoa or cinnamon on the foam gives this glass a lovely finish. Add more milk if the topping tastes too strong, and stir before drinking. The pretty layers are fun, but a creamy, balanced sip matters more than keeping them perfect.
Joy.Whip instant coffee, sugar and hot water into glossy dalgona coffee foam. Spoon it over milk and ice for a creamy two-layer coffee drink.
Tap each ingredient as it goes into your basket or bowl.
Follow the steps in order to make this recipe.
Combine instant coffee, sugar and hot water in equal proportions in a large mixing bowl.
For hand whisking, first stir until the coffee and sugar dissolve. Whisk briskly until the foam holds firm peaks. It may take several minutes depending on your pace; use the texture rather than a fixed whisk count to judge readiness.
A roomy bowl and rounded whisk make it easier to incorporate air. Tilt the bowl slightly as you whisk; a fork or spoon is much less efficient.
For the mixer method, start on low to dissolve the coffee and sugar, then increase speed until glossy, firm peaks form. Begin checking around 1½ minutes, allowing for differences between mixers, and stop when the foam holds.
For an optional crunchy garnish, prepare Korean dalgona candy using a separate candy recipe and break it into small pieces.
Divide 1 cup cold milk between 2 small glasses, using ½ cup per glass. Add ice if desired.
Spoon the whipped coffee over the milk. Add optional candy pieces, cocoa or cinnamon. Stir together for a latte-like drink, or sip through the foam and milk.
Whip instant coffee, sugar and hot water into glossy dalgona coffee foam. Spoon it over milk and ice for a creamy two-layer coffee drink.
Joy’s kitchen note · My mornings start with school lunches and my husband's lunch, so I like a small coffee moment that feels a little different. A pinch of cocoa or cinnamon on the foam gives this glass a lovely finish. Add more milk if the topping tastes too strong, and stir before drinking. The pretty layers are fun, but a creamy, balanced sip matters more than keeping them perfect.